TrenchCalc Documentation
TrenchCalc is a trench volume calculator with advanced features for cement stabilization and project planning. Comprehensive guides and tutorials to help you get the most out of TrenchCalc.
Getting Started
Quick Start Guide
Welcome to TrenchCalc! Our core feature is the trench volume calculator — this guide will help you get started with your first trench volume calculations in minutes.
Step 1: Install the App
Download TrenchCalc from the App Store (iOS) or Google Play Store (Android) and install it on your device.
Step 2: Open TrenchCalc
Launch the TrenchCalc app on your device.
Step 3: Click Start Trench Setup Button
Tap the "Start Trench Setup" button to begin creating your first trench calculation.
Step 4: Follow the Wizard and Enter Dimensions
Follow the setup wizard and enter your trench dimensions:
- Length: Total length of the trench
- Base Width: Width at the bottom
- Depth: Depth from ground surface
Step 5: Receive Results
View your calculated trench volume and other results.
Step 6: Press Home Button to Access Range of Modifications and Tools
Press the home button to access a range of modifications and tools, including:
- Culvert planning
- Cement stabilization
- Zones configuration
- And many more features
Installation
System Requirements
- Operating System:
- Android: Android 9 (API 28+) or higher
- iOS: iOS 17.0 or higher
- RAM:
- Minimum: 3GB
- Recommended: 4GB or more
- Storage:
- Base app size: 200MB
- Recommended free storage: 2GB
- LiDAR Scanner Requirements: The Site Survey (LiDAR scanning) feature requires:
- iPhone 12 Pro or later, or
- iPad Pro 11" or 12.9" (3rd generation or later)
- Internet connection required for premium features
Trench Volume Calculator — Core Feature
Trench volume calculation is the foundation of TrenchCalc. Our calculator supports multiple trench configurations and provides volume estimates for any project.
Basic Dimensions
TrenchCalc supports multiple trench configurations:
Rectangular Trench
Simple rectangular cross-section with uniform width
Trapezoidal Trench
Battered trench side walls with tapered sides
Benched Trench
Stepped benches (1:1) for stability in deep excavations
Multi-Zone Calculations
TrenchCalc allows you to define multiple zones within a single trench:
- Bed Zone: Main trench bed
- Haunch Zone: Side support areas
- Side Fill Zone: Backfill material
- Overlay Zone: Surface layer
- Gap Zone: For between box culverts
- General Zone: Everything else
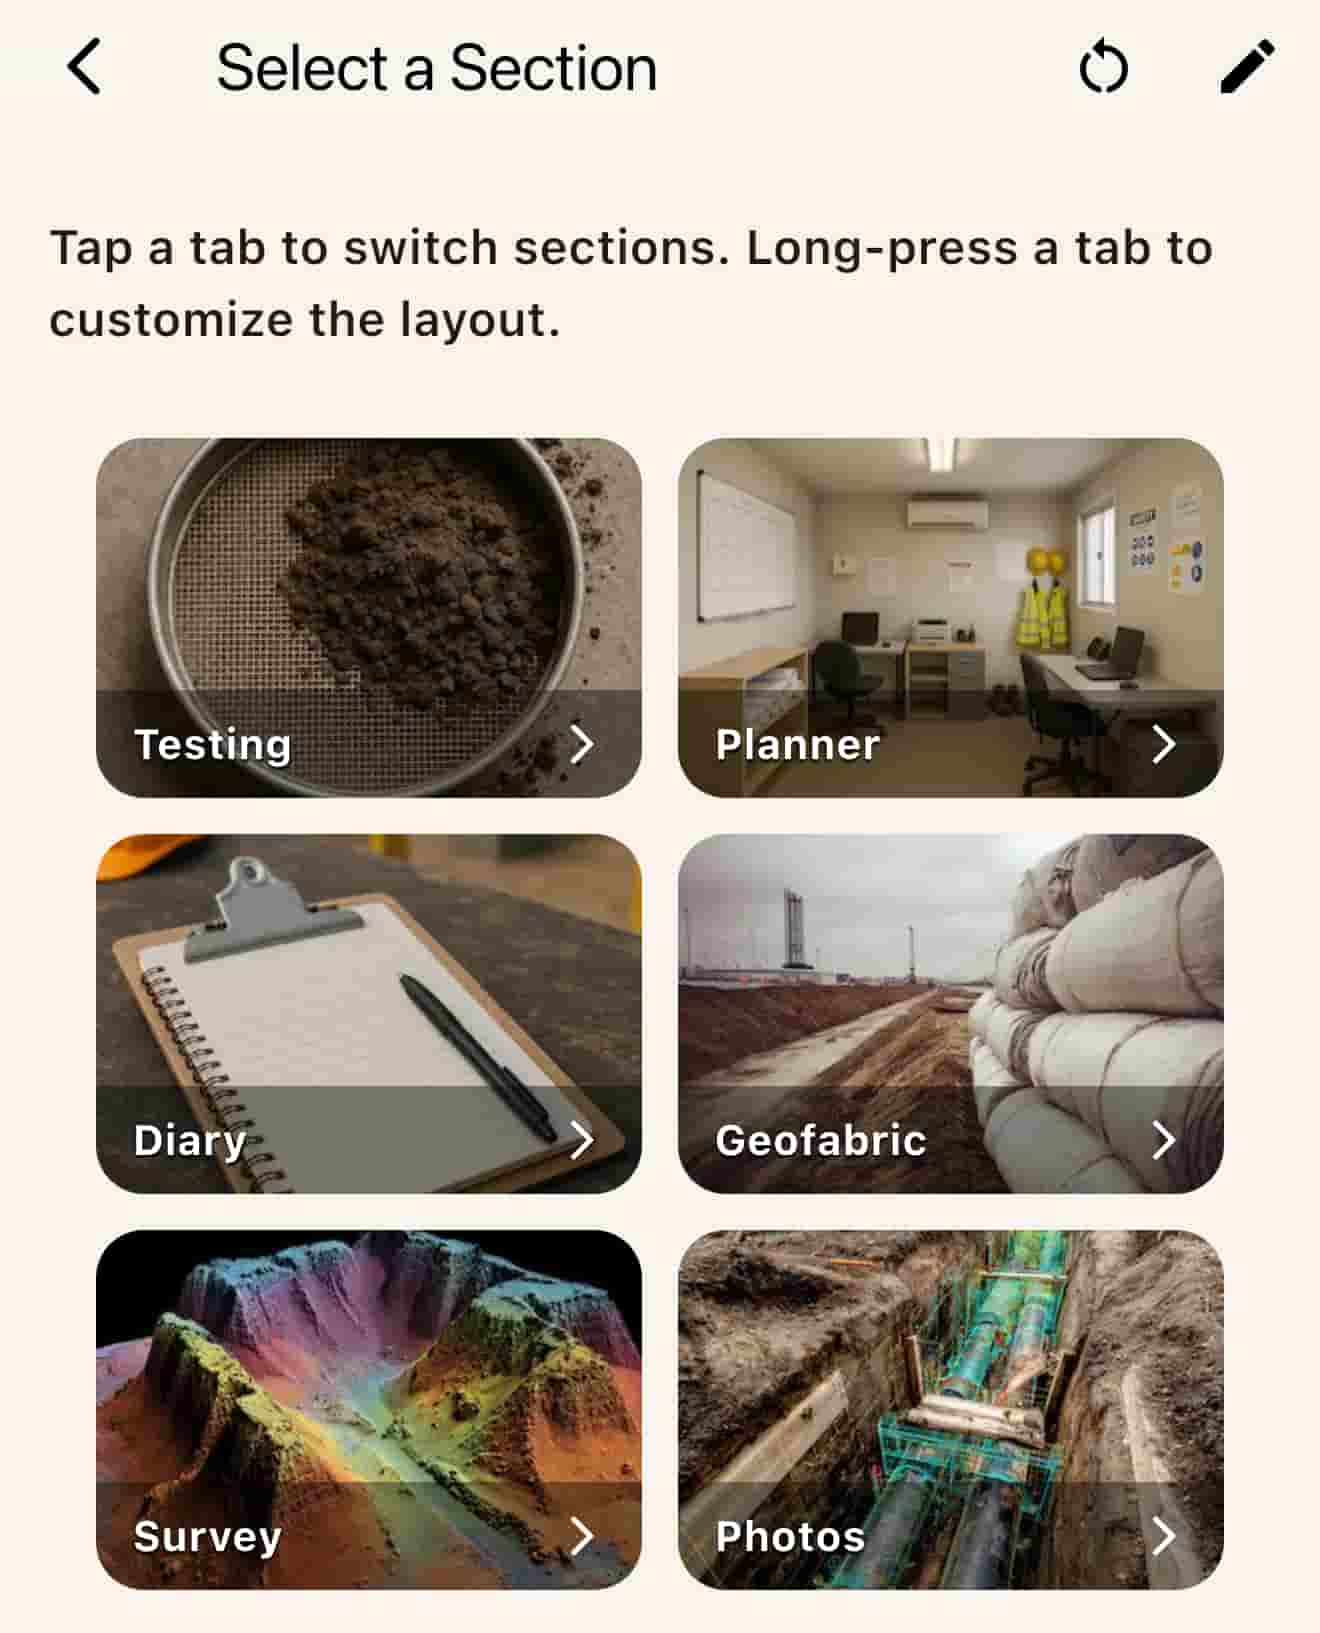
All Tab Features Guide
TrenchCalc organizes features into 12 tabs across 3 customizable pages. You can mix and match which tabs you want in each page. Tabs are organized by subscription tier, with some features requiring Basic or Premium plans.
Tab Organization
The app provides 3 customizable pages where you can arrange tabs as needed. Available tabs include:
- Basic, Fill, Cement, Wall, Culverts, Geofabric
- Spoil, Testing, Planner, Diary, Survey, Photos
Free Tier Tabs
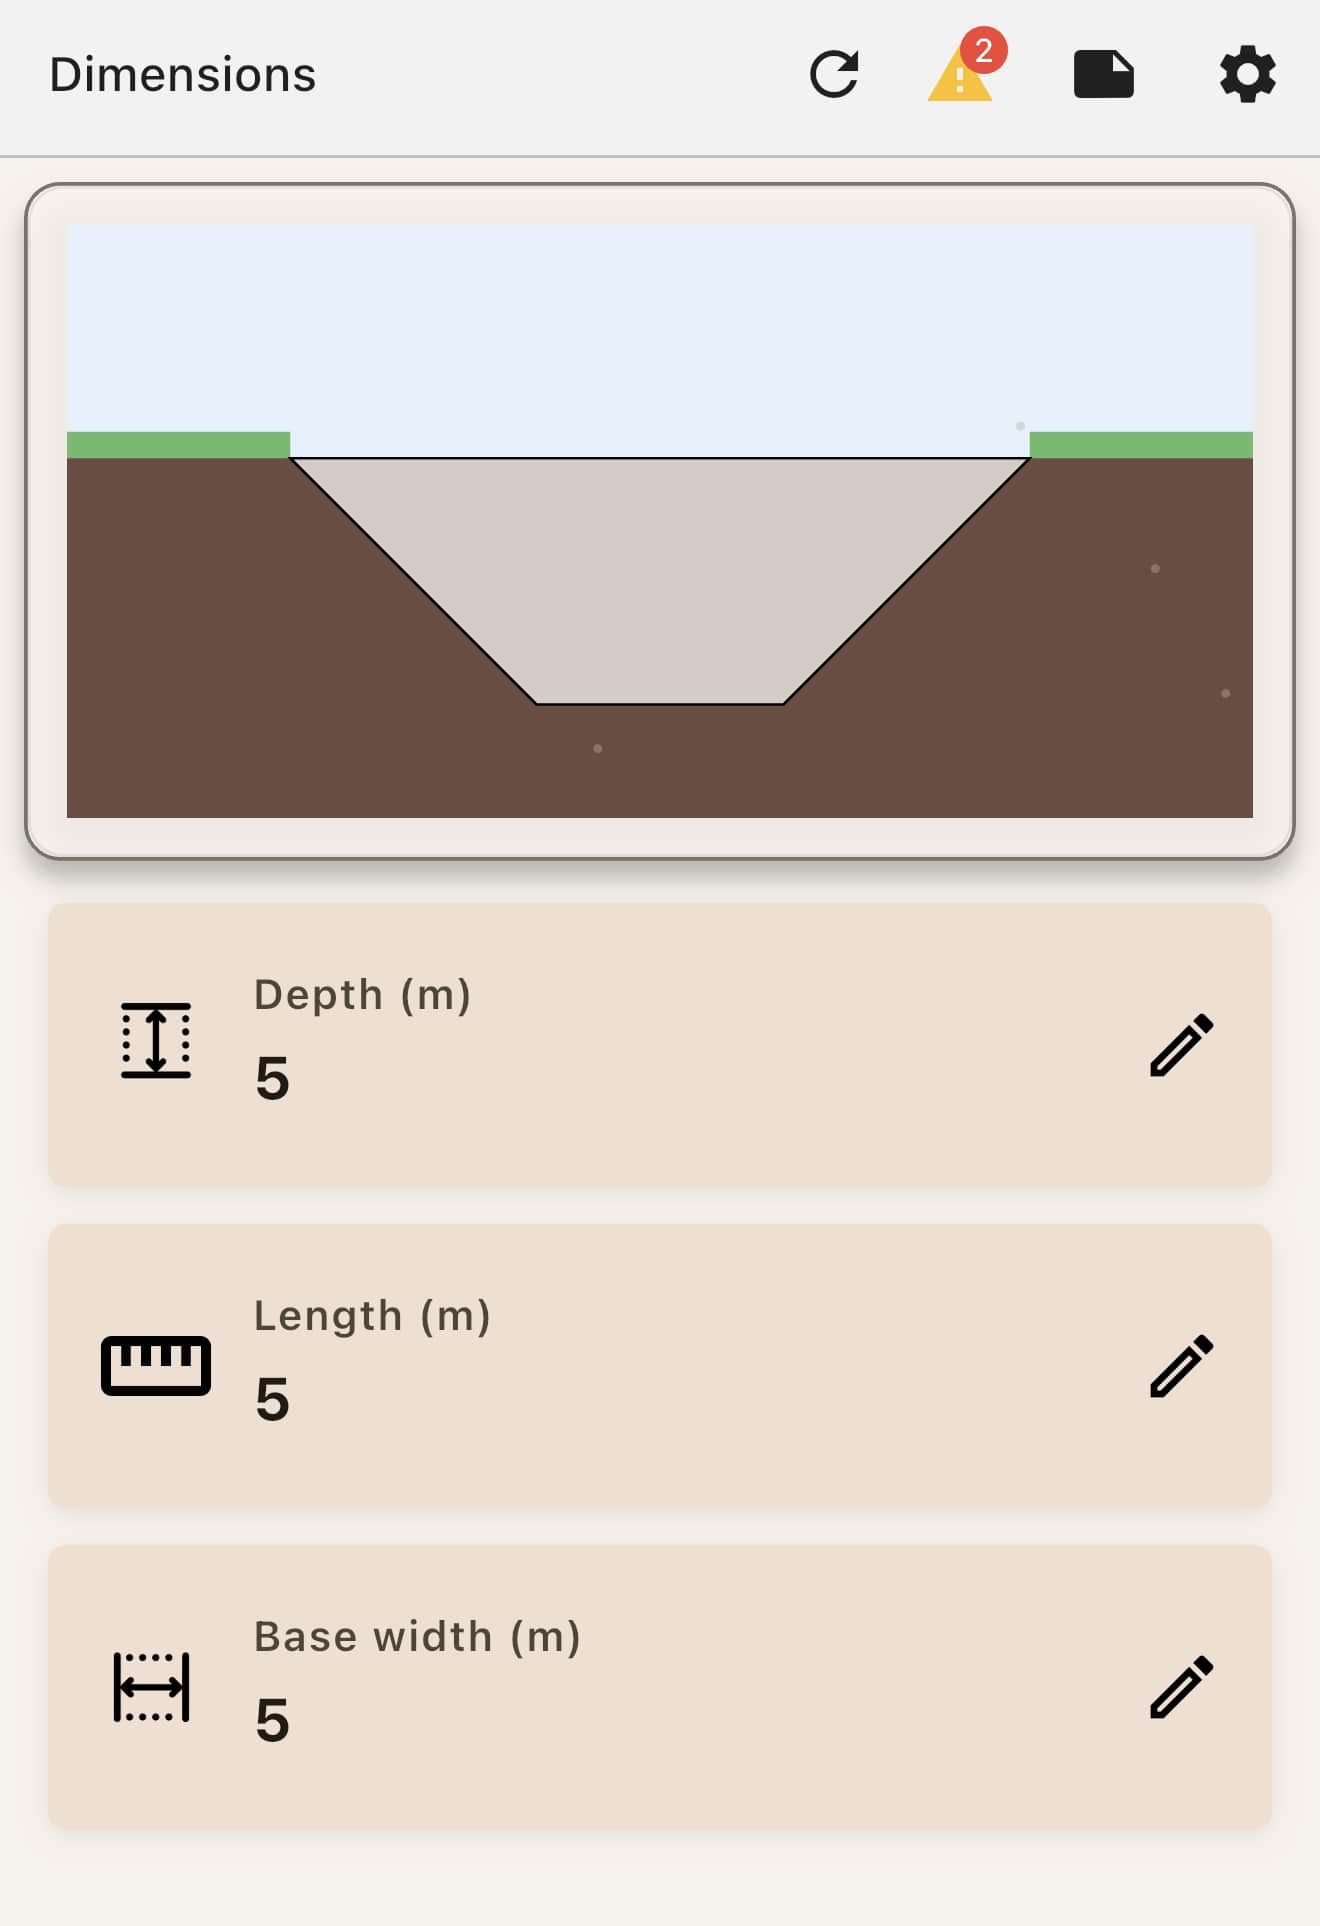
1. Basic Tab - "Change Trench Size"
Features:
- Set trench depth, length, and base width
- Supports both metric (m) and imperial (ft) units
- Real-time diagram visualization
- Input validation
- Wizard mode for guided setup
This is your starting point. Enter the fundamental dimensions of your trench to begin calculations.
2. Fill Tab - "Change Fill Type"
Features:
- Select fill material (preset or custom)
- Configure material density (kg/m³ or lb/ft³)
- Set compaction factor
- Enable zone-based fill configuration
- Configure bedding depth and overlay depth
- Supports multiple fill zones: bed, haunch, side, overlay, gap, general
- Real-time volume calculations
Define what material will fill your trench. You can assign different materials to different zones for complex projects.
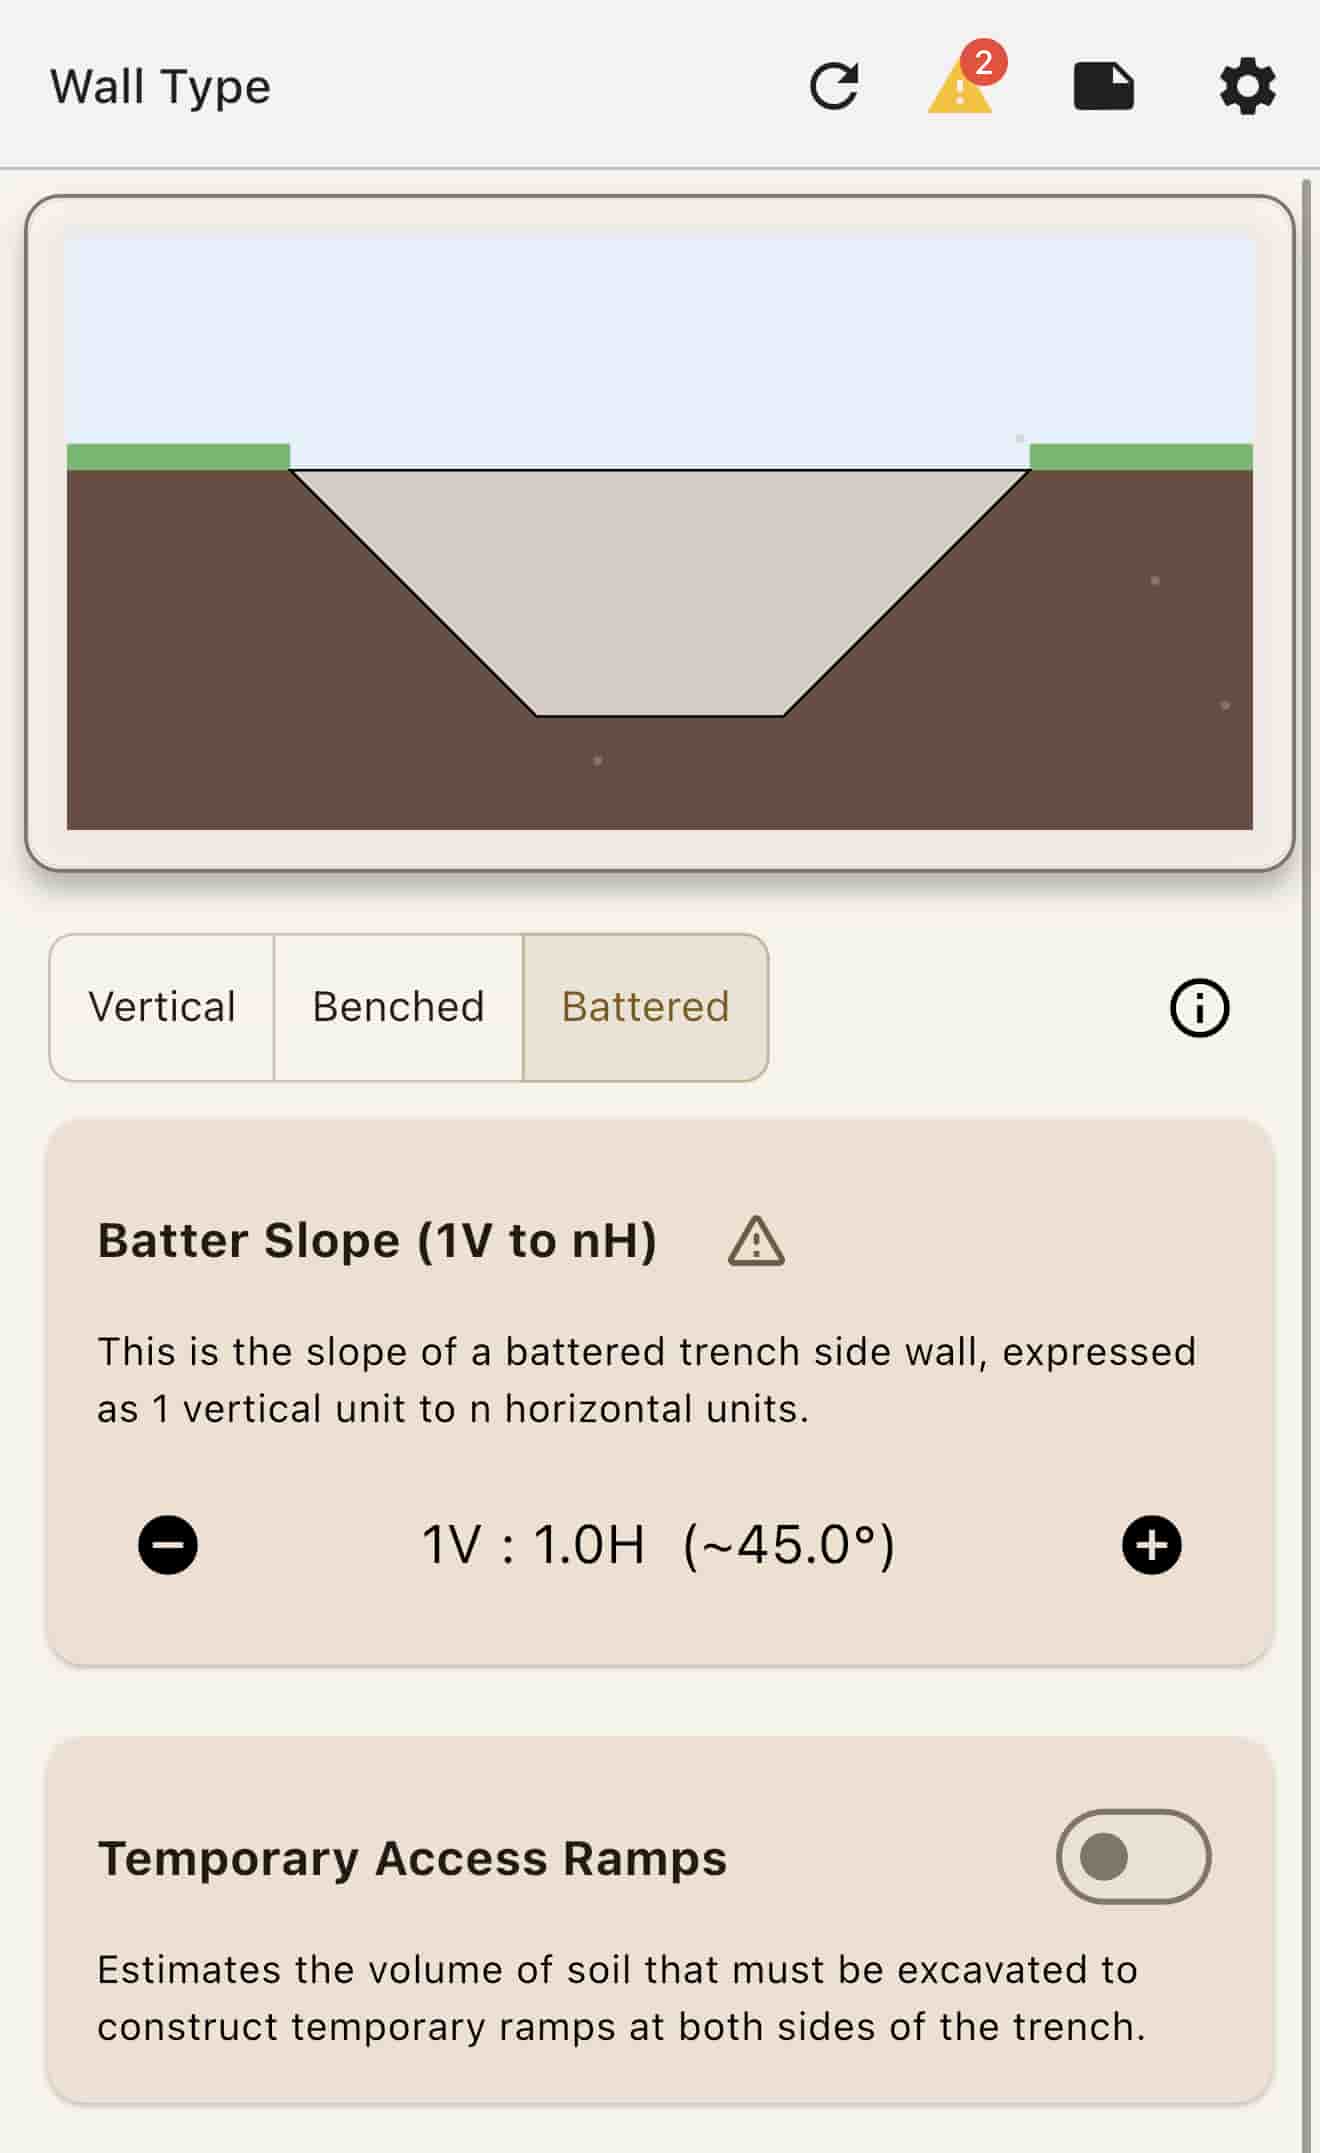
3. Wall Tab - "Add Benching / Battering"
Features:
- Three wall types: Vertical, Benched, Battered
- Configure bench step height (for benched walls)
- Set batter slope ratio H:V (for battered walls)
- Temporary ramp configuration
- Ramp volume calculations
- Visual diagram showing wall configuration
Choose how your trench walls are configured. Vertical walls are simplest, while benched or battered walls provide stability for deeper excavations.
Basic Tier Tabs
4. Cement Tab - "+ Add Cement"
Features:
- Cement percentage slider (0-20%)
- Per-zone cement application (if zones enabled)
- UCS (Unconfined Compressive Strength) calculation
- Water/cement ratio configuration
- Flowable fill calculations
- Weather advisory integration
- Cement mass and volume displays
- Custom soil type selection for UCS
5. Culverts Tab - "+ Add Culverts"
Features:
- Circular or box culvert shapes
- Configure culvert count
- Set diameter (circular) or width/height (box)
- Configure spacing between culverts
- Set distance to walls
- Fit validation (warns if culverts don't fit trench)
- Visual diagram with culvert placement
- Supports multiple culverts with spacing calculations
6. Diary Tab - "Site Diary"
Features:
- Voice input transcription
- Location and date tracking
- Uses AI to reconstruct voice transcription and polish it into a detailed diary
Premium Tier Tabs
6. Spoil Tab - "Manage Spoil"
Features:
- Calculate spoil volume from excavation
- Configure spoil pile dimensions (angle, height, base width, toe distance)
- Split spoil evenly on both sides option
- Display metrics:
- Volume per side
- Base width
- Height
- Centre from trench
- Total spoil volume
- Visual diagram showing spoil pile placement
- Help tooltips for each metric
Plan where excavated material will be stored. The app calculates spoil pile dimensions based on your trench volume.
7. Testing Tab - "Soil Testing"
Features:
- Compaction testing
- PSD (Particle Size Distribution) testing setup
- Atterberg test
- Test volume calculations
- Integration with planner for test scheduling
- Foundation test configuration
- Test frequency settings (per lift, per zone)
8. Planner Tab - "Construction Planner"
Features:
- Project timeline estimation
- Cost estimation and breakdown
- Productivity calculations
- Culvert installation rate configuration
- Mobilization/demobilization costs
- Duration breakdown (by activity)
- Categories: Personal, Plant, Material, Soil Testing, Logistics, Production
Estimate costs, timelines, and reporting.
9. Geofabric Tab - "Geofabric Lining"
Features:
- Calculate geofabric surface area requirements
- Roll size configuration (preset or custom)
- Overlap configuration between rolls
- Wastage percentage settings
- Calculate number of rolls required
- Total linear meters calculation
- Cost estimation (price per roll)
- Supports all wall types (vertical, battered, benched)
Calculate how much geofabric you need, accounting for overlaps and wastage.
10. Survey Tab - "Site Survey"
Features:
- AR camera integration for scanning
- Point cloud processing
- Volume calculation for stockpiles and trenches
- Unlimited LiDAR scanning
- Scan quality metrics
- On-device processing
- Measurement history
11. Photos Tab - "Photo Documentation"
Features:
- Camera capture with GPS tagging
- Tagging system (28 pre-built tags + custom tags)
- Photo detail viewer
- Annotation capabilities:
- Coordinates of the photo markup
- Direction the photo was taken
- Map where the photo was taken
- Free text title of the photo
Annotation for project photos.
Tab Locking System
Tabs are locked based on your subscription tier:
- Free tabs: Available (Basic, Fill, Wall)
- Basic tier: Adds Cement, Culverts, and Diary tabs
- Premium tier: Unlocks all 12 tabs
Locked tabs show a lock icon and require login or upgrade to access.
Special Features Across Tabs
Basic Tier:
- Watercart Load Calculator: When cement is enabled, calculates water requirements for cement stabilization.
All Tiers:
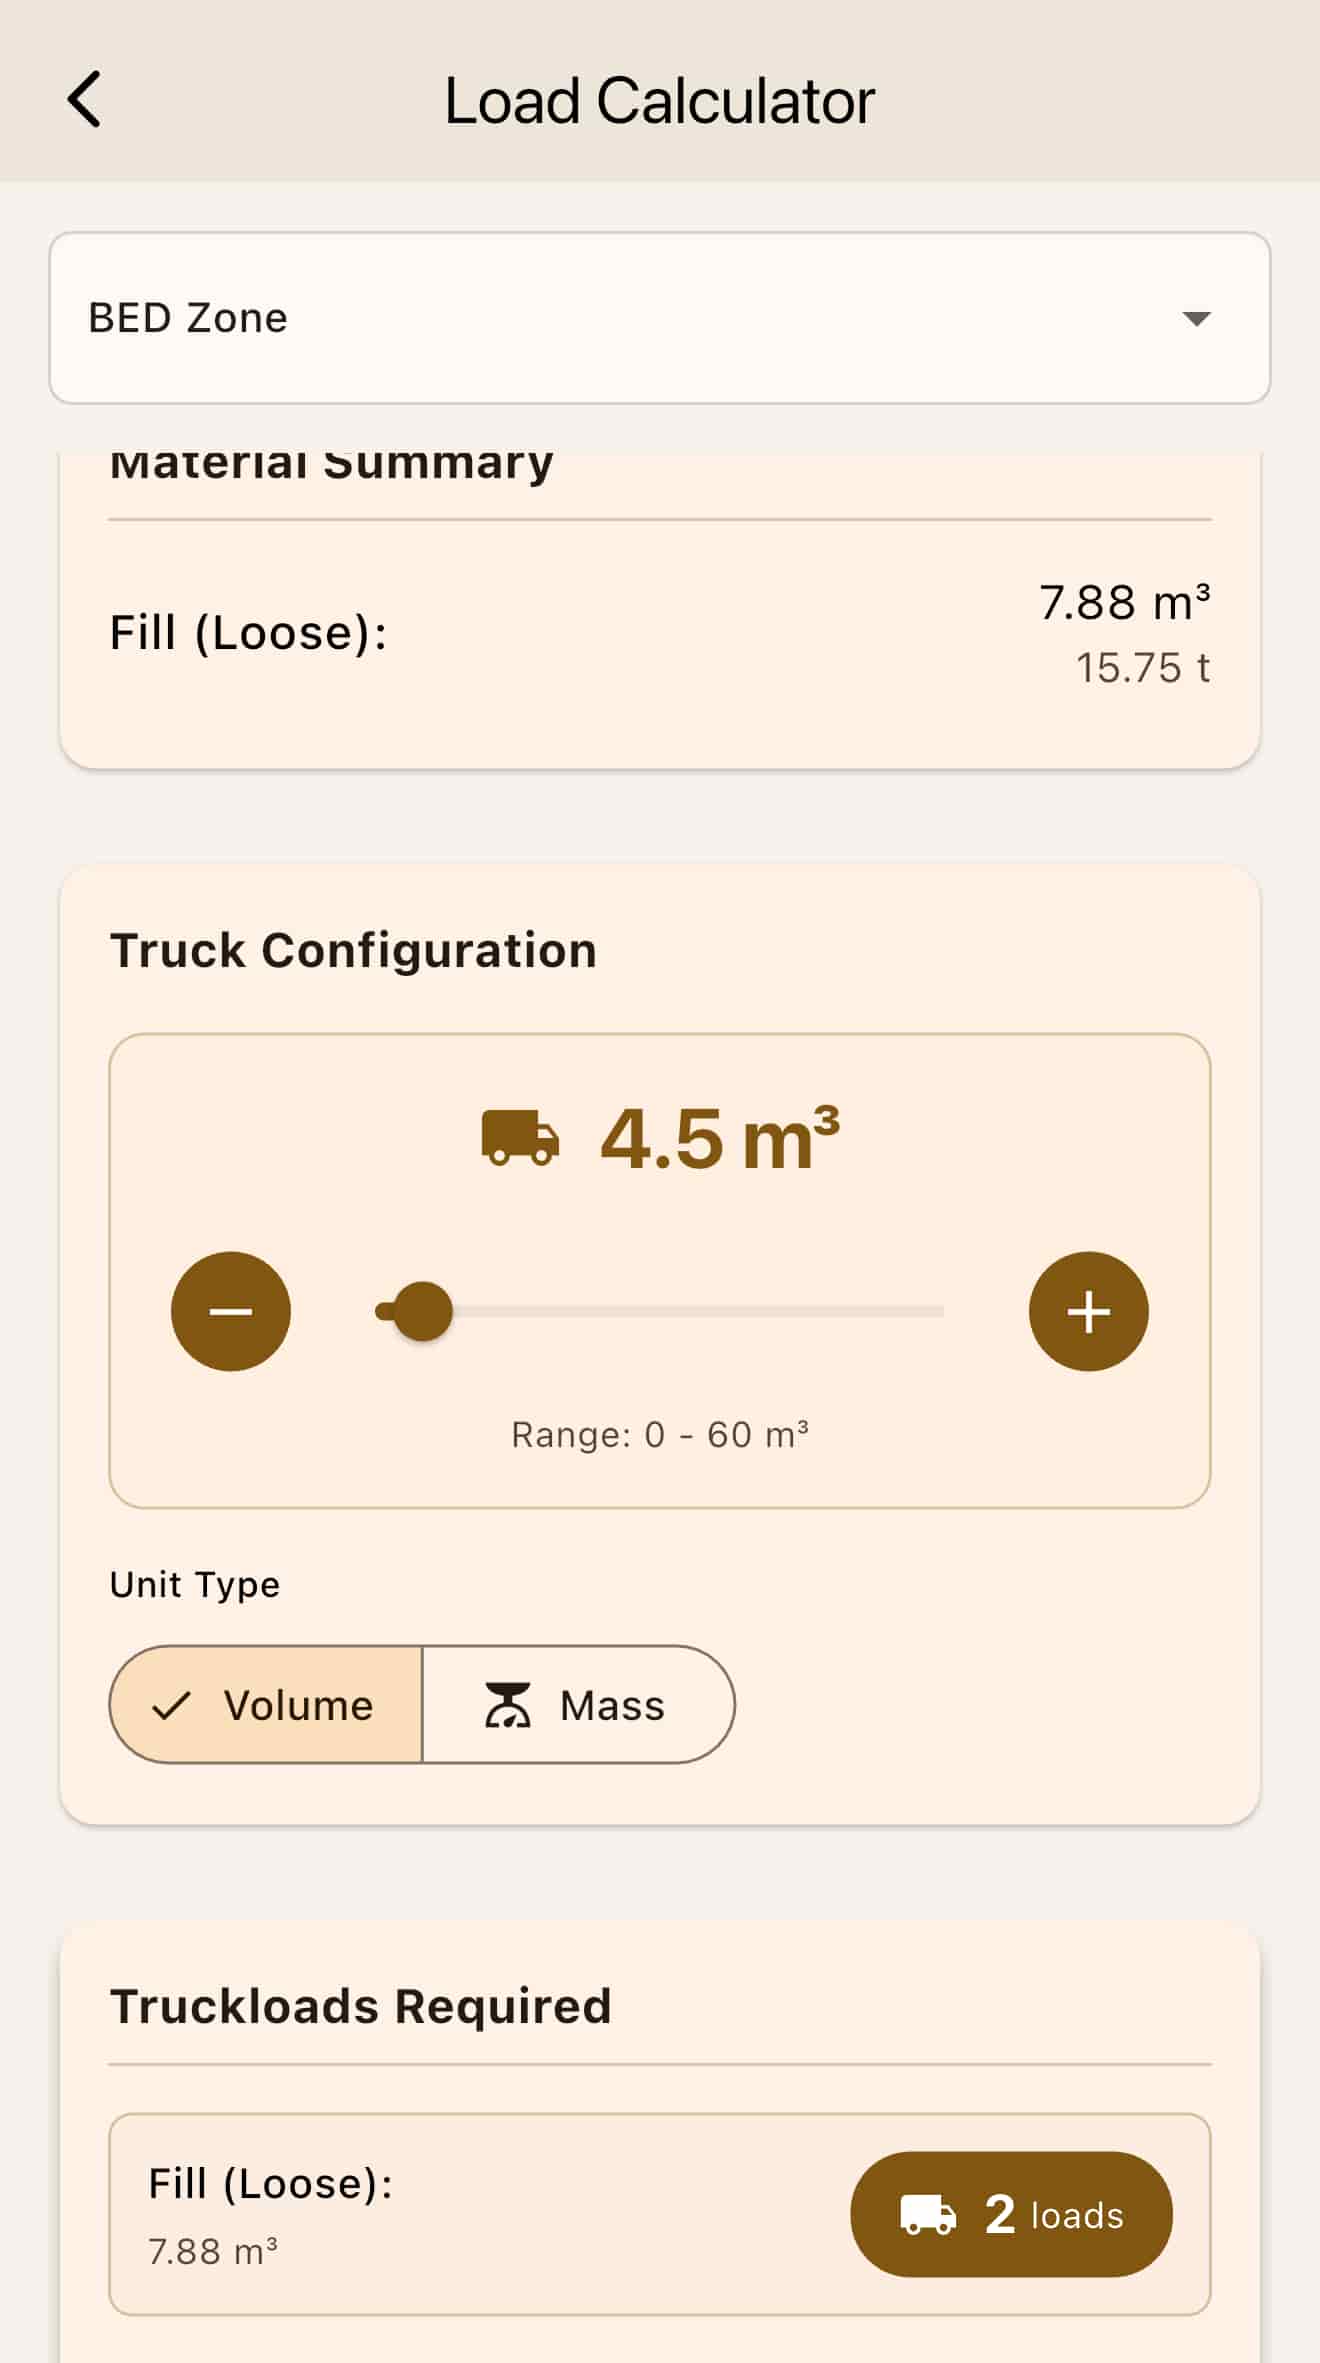
- Loads Calculator: Calculates how many truck loads are needed to move trench volume or stockpile of dirt based on the size of your truck.
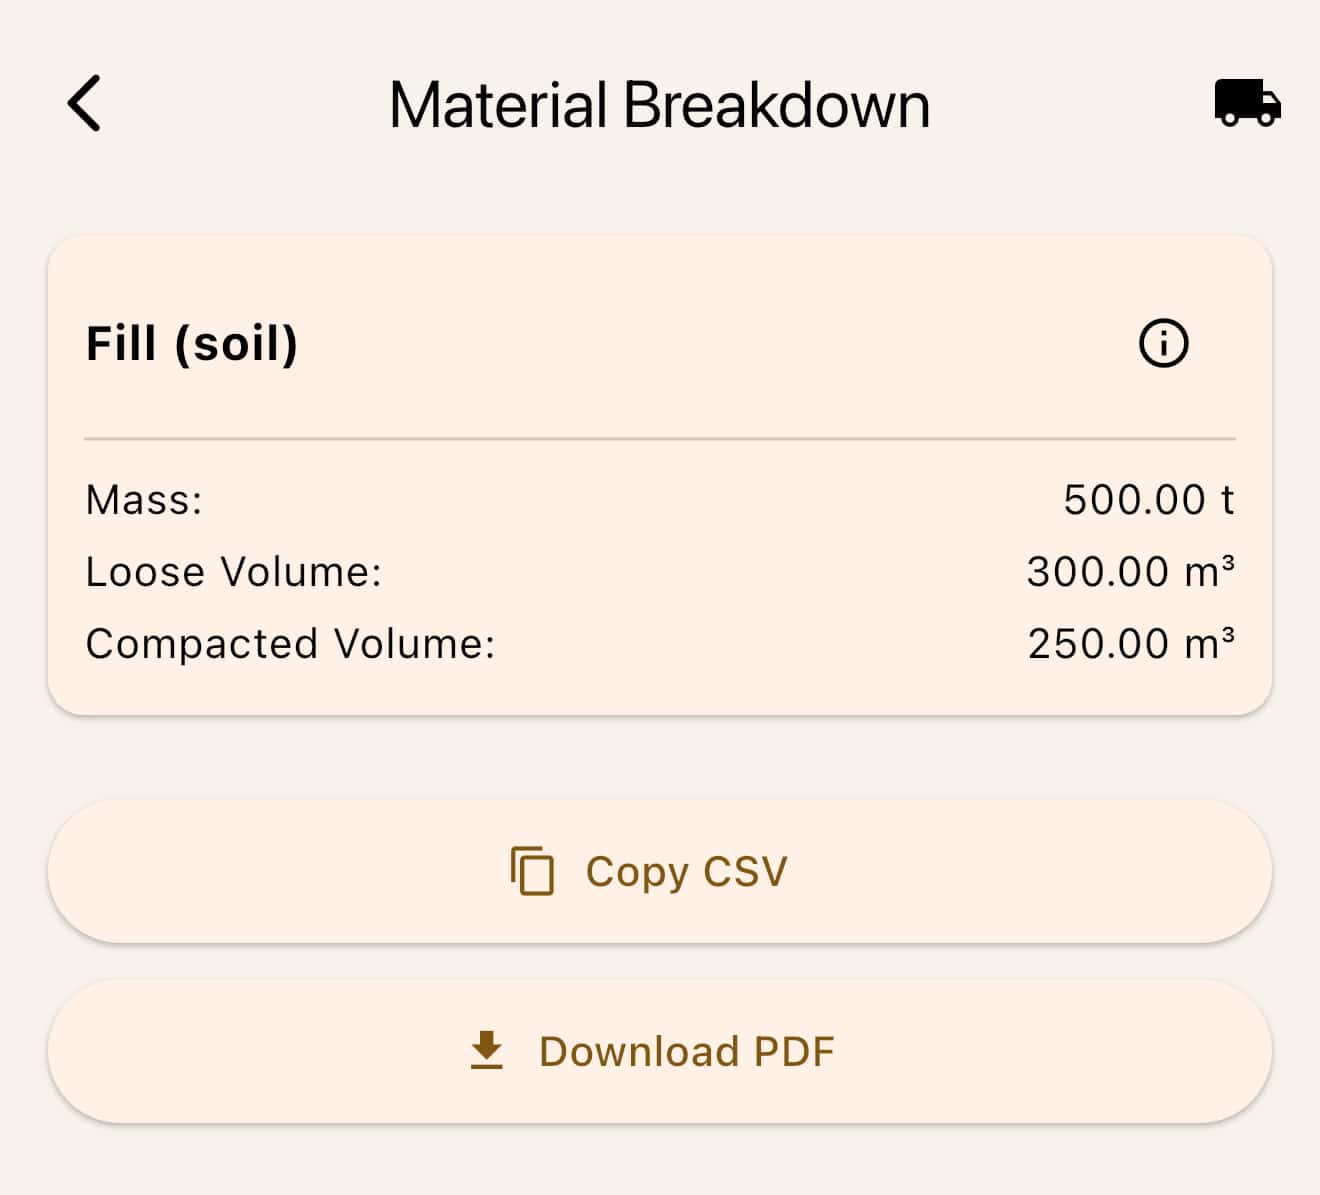
- Export: Export material breakdown and zone breakdown of volumes and mass quantities
- Save/Load Trench Configurations: Save and load your trench configurations for reuse
- Light and Dark Mode: Switch between light and dark themes for comfortable viewing in any environment
- Real-time Calculations: All tabs update calculations immediately on input changes
- Visual Diagrams: Most tabs include real-time visual representations
- Unit Conversion: All tabs support metric and imperial units
Cement Stabilization
Overview
Cement stabilization is used to improve soil strength and durability. TrenchCalc helps you calculate the required cement content and estimate strength values.
Calculating Cement Requirements
TrenchCalc supports two methods for cement stabilization:
Method 1: If zones are not activated
- Navigate to the "Cement" tab
- Use the slider to adjust the percentage of cement (0-20%)
- The amount of cement (total and mass) dynamically updates, showing total cement required as well as the estimated UCS of the cement stabilized soil
- Adjust water cement ratio to determine flow spread of the cement stabilized mix
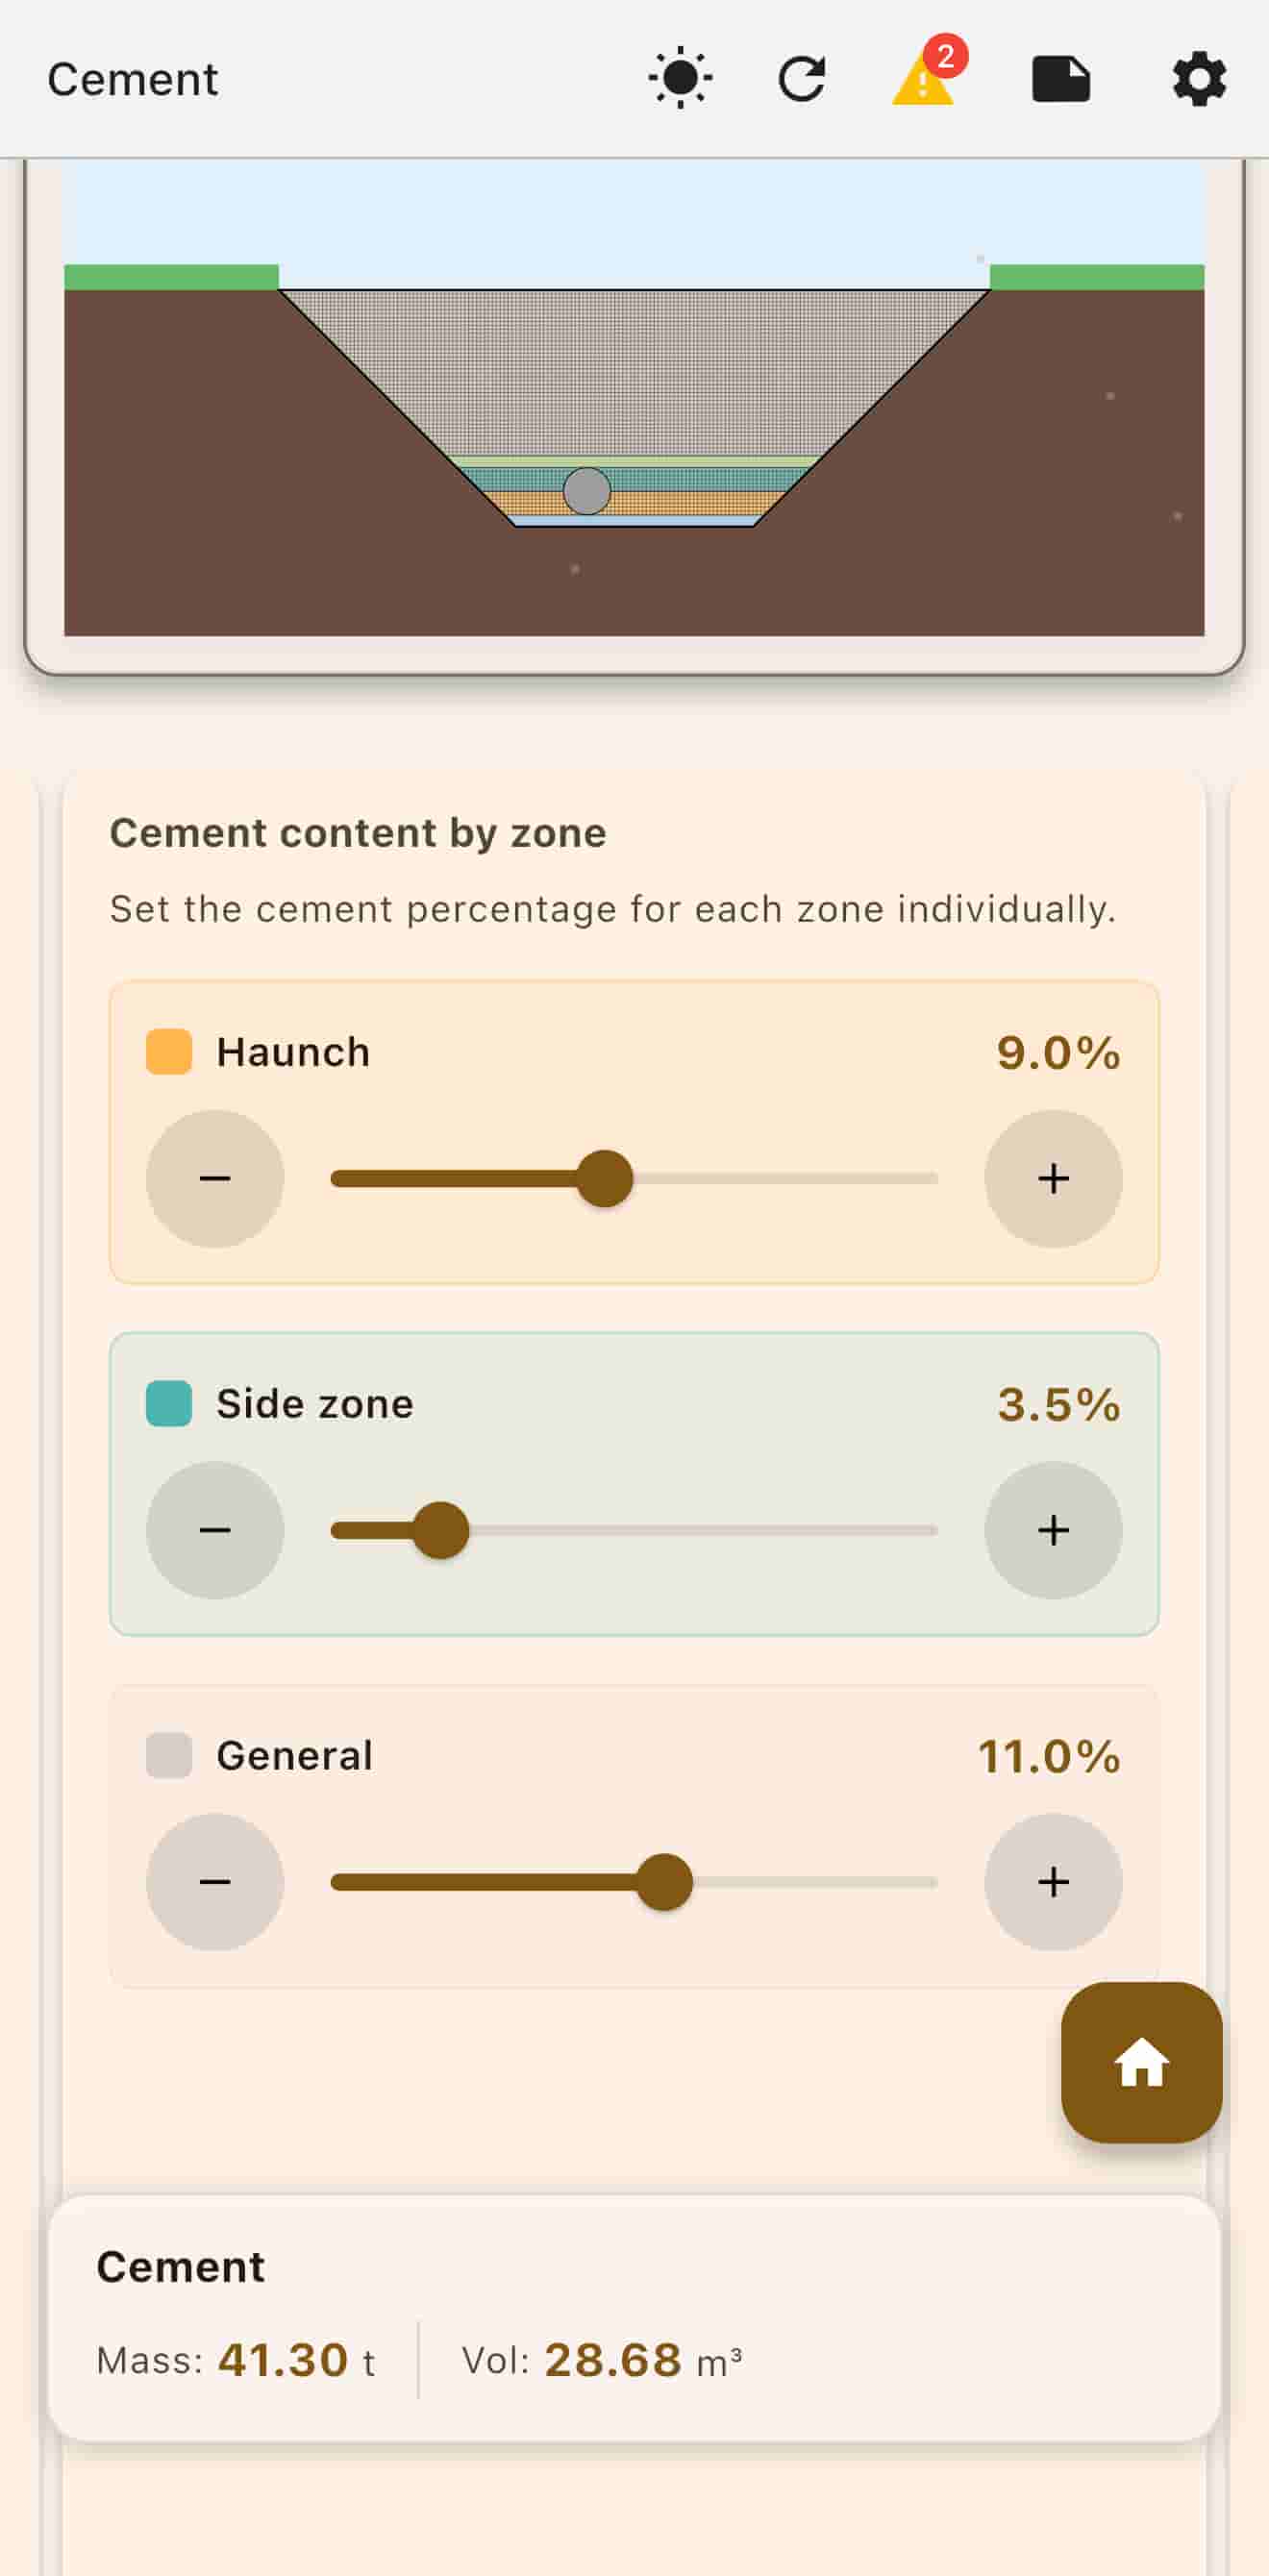
Method 2: If zones are activated
- Navigate to the "Cement" tab
- Pick zones to cement stabilize
- Use sliders to configure the cement content percentage for each zone
- Pick a zone and adjust water/cement ratio
- Results show 7-day and 28-day UCS estimated results for each zone
UCS Calculations
TrenchCalc calculates UCS estimates based on:
- Soil type and properties
- Cement content percentage
- Curing time (7-day and 28-day estimates)
Mix Design
The app calculates:
- Dry soil weight required
- Cement weight needed
- Water content calculations
- Total stabilized mix volume
Weather Advisory
The Cement tab includes a weather advisory feature that lets you know whether today is ideal for cement stabilization based on:
- Humidity levels
- Temperature/heat conditions
- Rain forecast
- Other weather factors
This helps you plan your cement stabilization work for optimal conditions.

Culvert Planning
Adding Culverts
Culvert planning helps you position pipes within your trench using a guided wizard:
- Go to the "Culverts" tab
- Pick between add circular culverts or box culverts wizard
- Pick number of culverts
- Culvert size: Enter diameter for circular culverts, or length and width for box culvert
- Specify clearance from the left wall
- If you have more than 1 culvert, you will be prompted for culvert spacing. If not, this step won't show up
- Enable fill zoning. Otherwise you can press finish here and view your culvert trench diagram setup for review. If you did enable fill zoning, proceed to step 8
- Specify bedding zone thickness
- Overlay zone thickness
- Finish: Review the trench diagram. Press the bottom left button (x icon) to return back to the main culverts tab with the culverts fields prepopulated by the wizard
Spacing Calculations
TrenchCalc automatically calculates:
- Minimum spacing between culverts
- Bedding material requirements
- Cover depth compliance
- Volume adjustments (subtracts culvert volume from trench)
Validation and Warnings
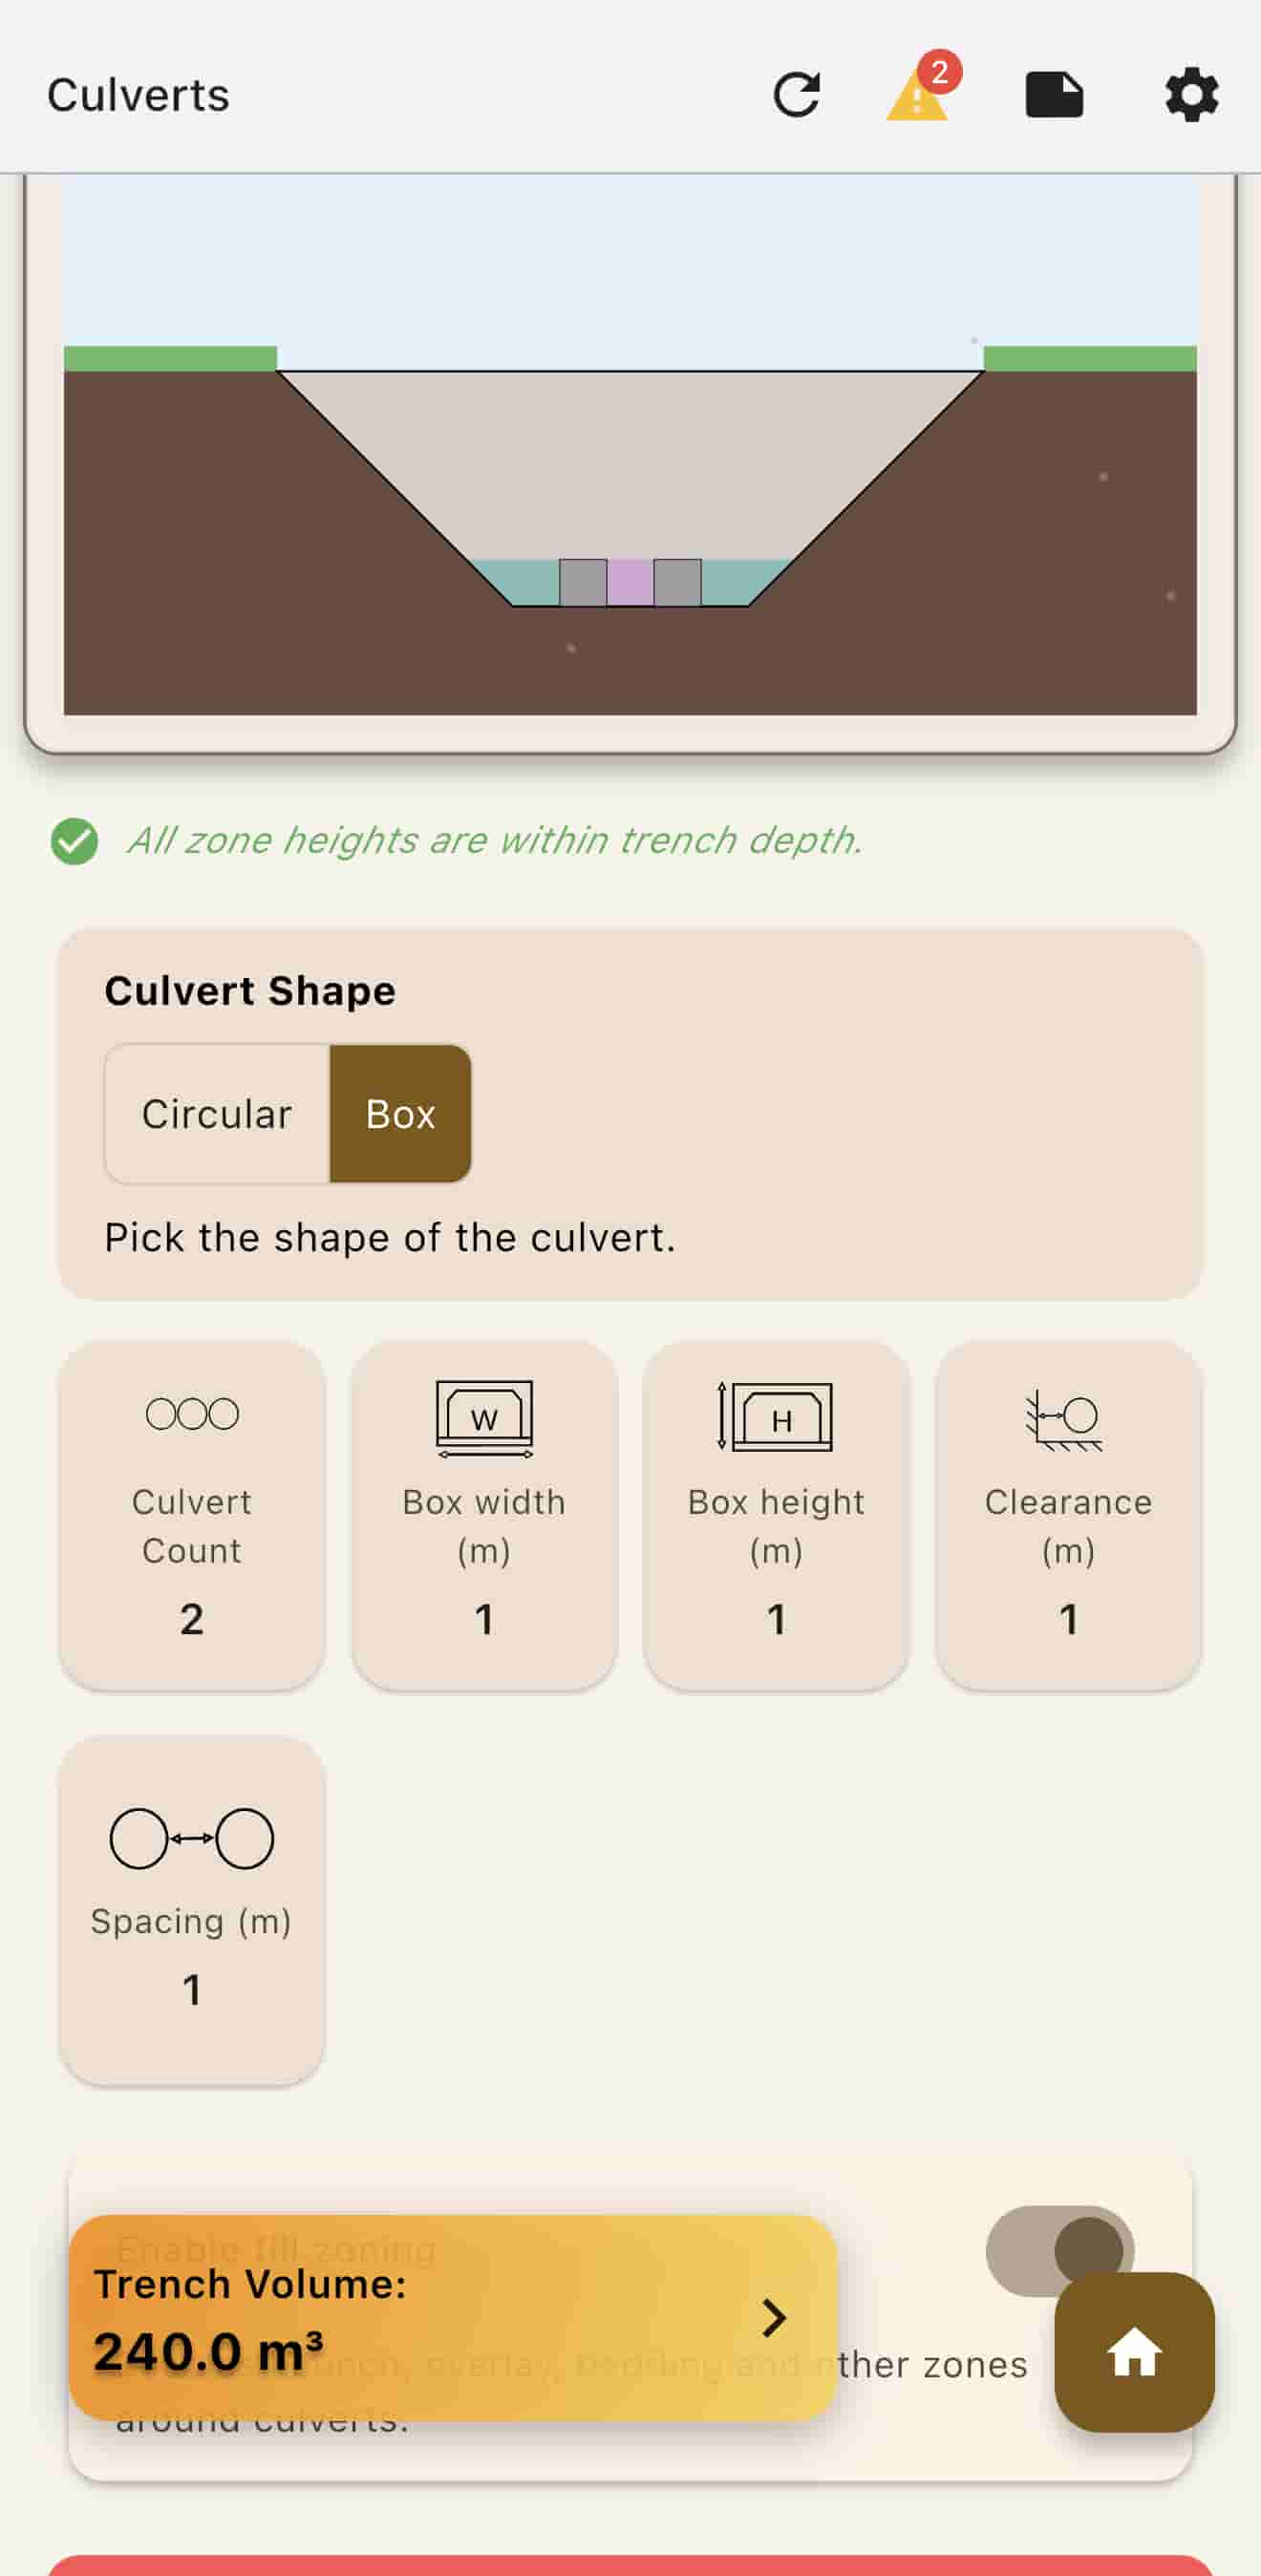
The UI provides visual feedback for your culvert and zone configurations:
- Success Indicator: If zones and culverts fit properly, you will see a tick icon with "All zone heights are within trench design" underneath the trench diagram previewer
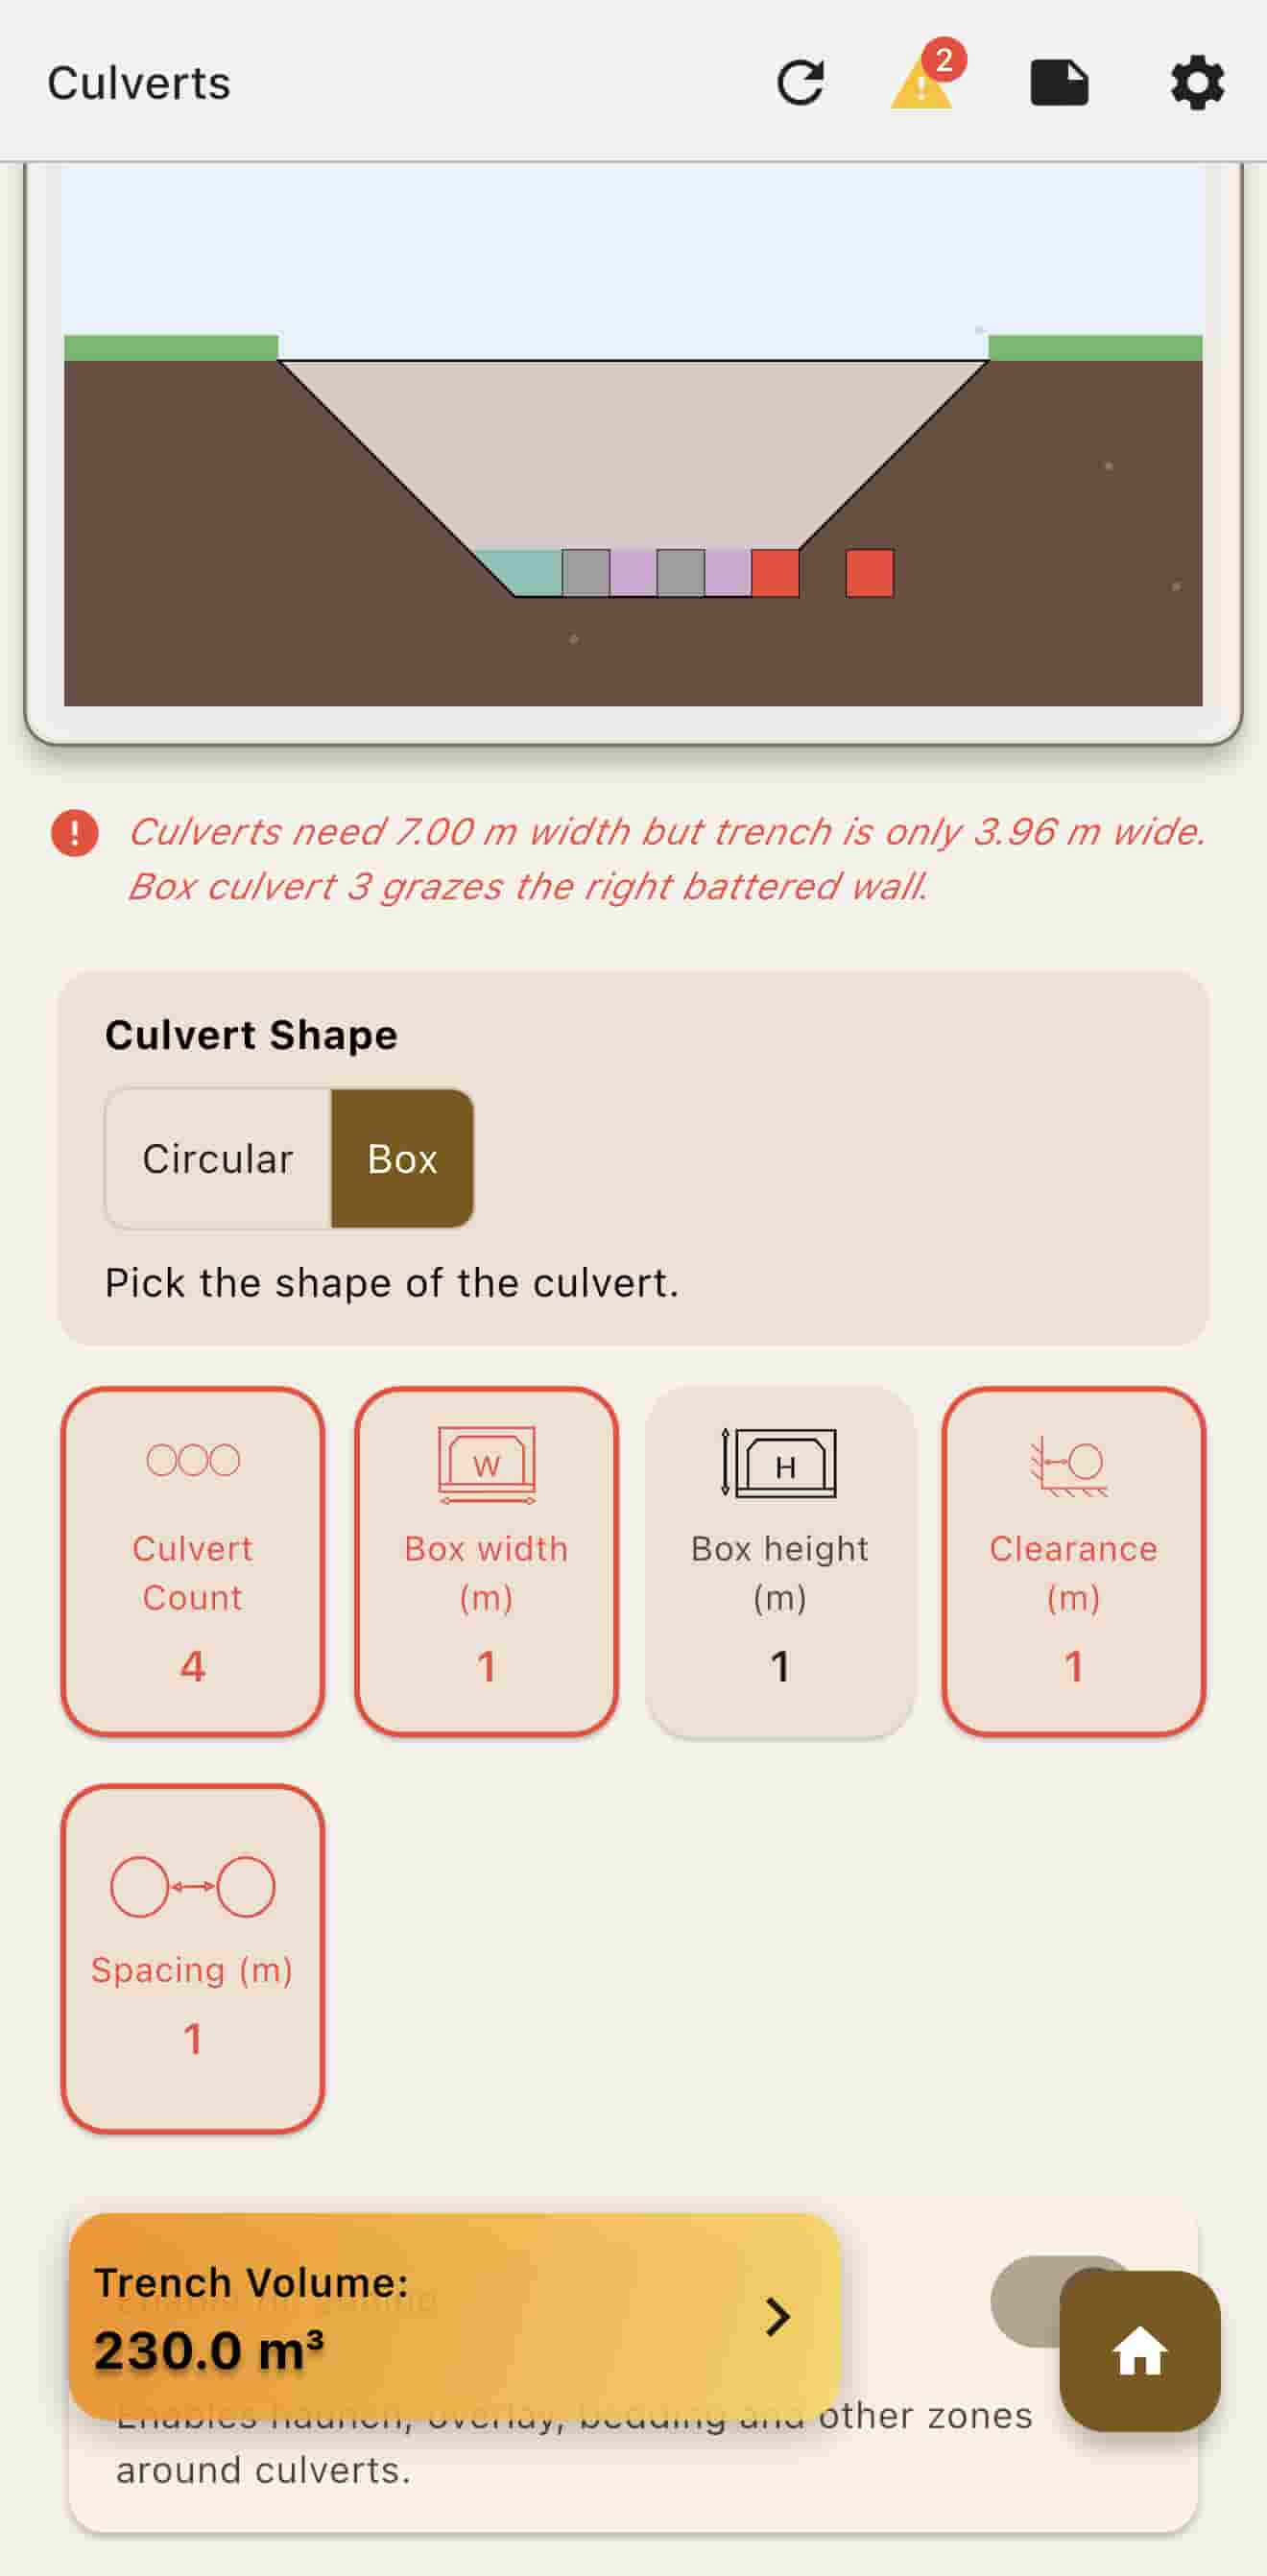
- Warning Indicators: When configurations don't fit properly:
- If a culvert protrudes out of the trench, relevant sections (such as the height card and other configurations) will be outlined in red
- If you have multiple culverts that cannot fit in the trench, the UI will light up red and show a warning
- If zones are too tall and protrude out of the trench, there will be a warning on the UI
- These visual indicators help you quickly identify and confirm proper configurations or correct any issues
Reconfiguring Culverts
After setting up culverts, you can modify them as needed:
- Click on the relevant cards to reconfigure culvert inputs and enter new values
- Use the red "Reset Culverts" button below if you need to start again
- Use the "Enable Fill Zoning" toggle if you decide to re-enable or disable zoning
Trench Settings
Saving Trench Configurations
Save your trench configurations in two ways:
Quick Save
- After entering your trench data, tap the menu (gear icon)
- Click "Quick Save" to use the quick save slot
Manage Saves
- Click "Manage Saves" from the settings menu
- You will be presented with a screen of all your saves
- Click the bottom right "Save Current" button
- A popup will prompt you to name that save
- Give it a name and then click "Save", or click "Cancel" if you don't want to save
Loading Saved Configurations
Retrieve saved trench configurations in several ways:
- Quick Load from Settings: On the gear icon settings screen, press "Quick Load" to load from the quick save slot
- Quick Load on Startup: If you are signed in with your account, on app startup there will be a "Quick Load" button underneath the "Start Trench Setup" button
- Manage Saves: Go back to the settings screen (gear icon), click on "Manage Saves", and click any of the saved slots to load that trench setting
- All dimensions, materials, and settings are restored when loading
Viewing Trench Summary
On the app bar, there is a paper icon that shows a summary of your trench settings. The summary includes:
- Basic dimensions
- Fill information
- Whether there are culverts
- Cement settings
- What type of walls are used
- Whether any geofabric is used
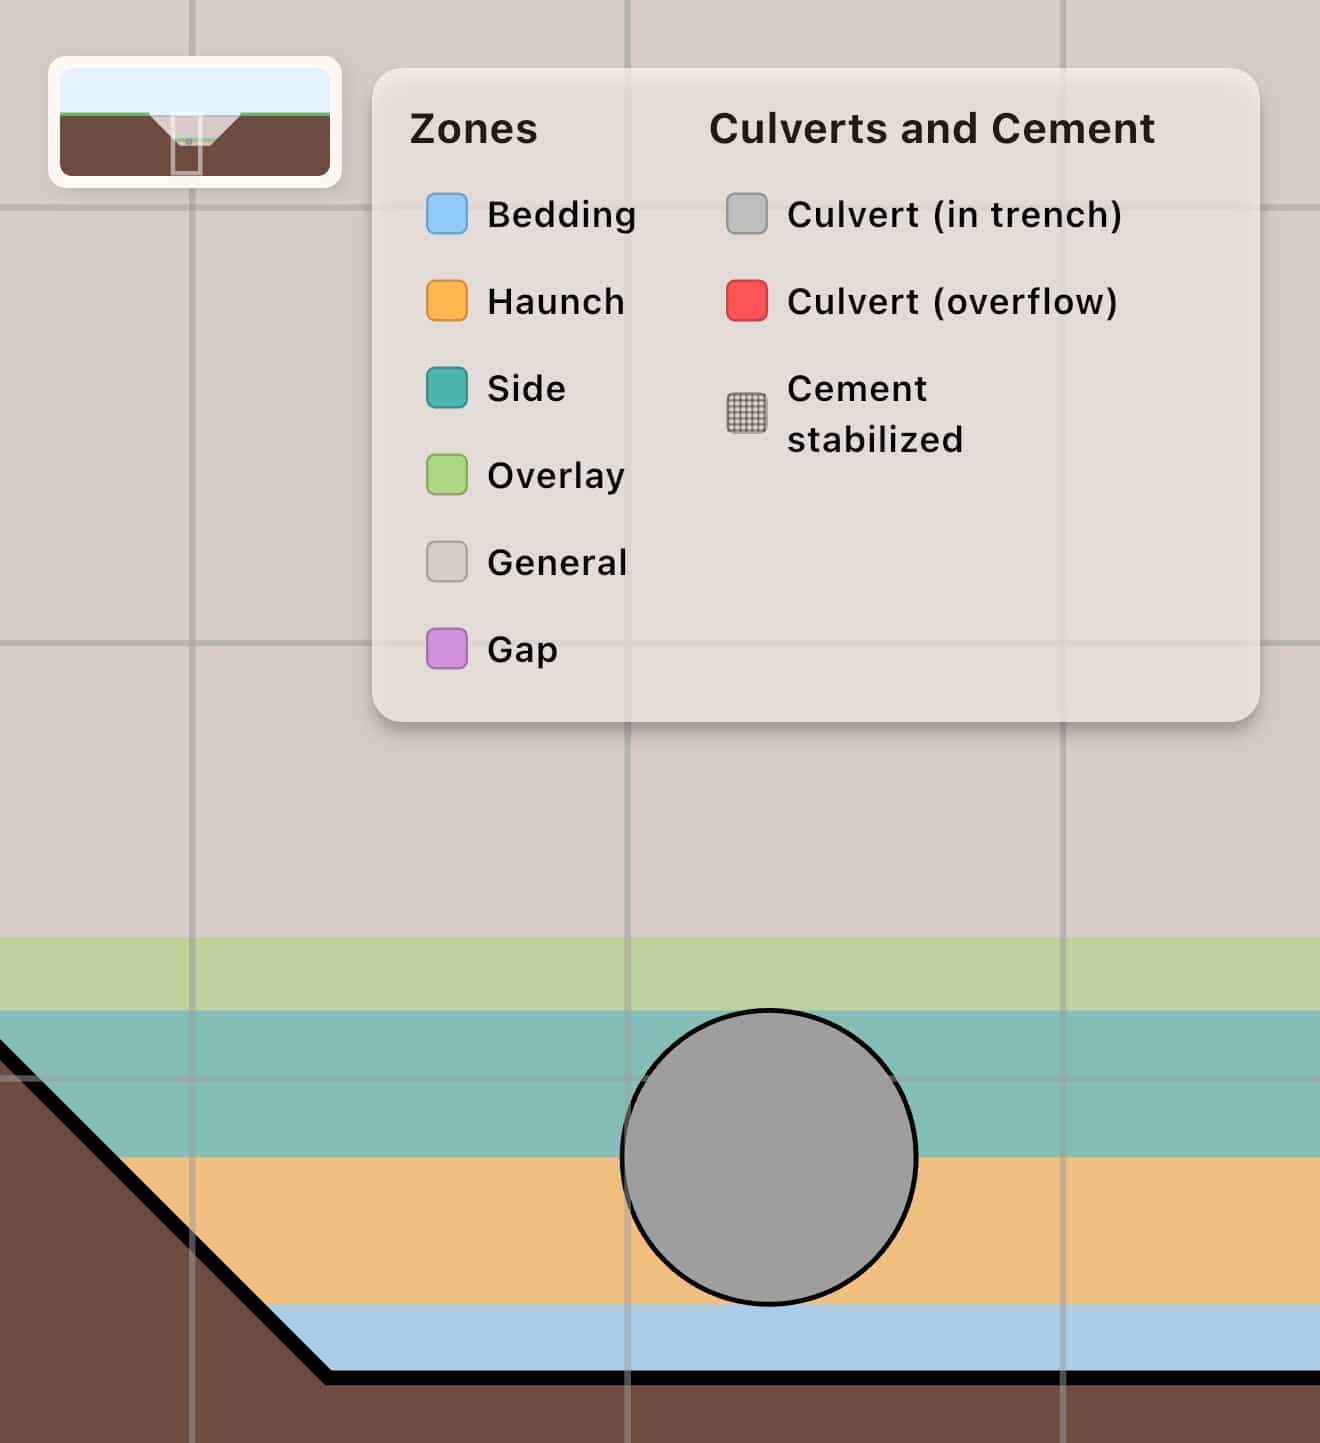
Trench Diagram Viewer
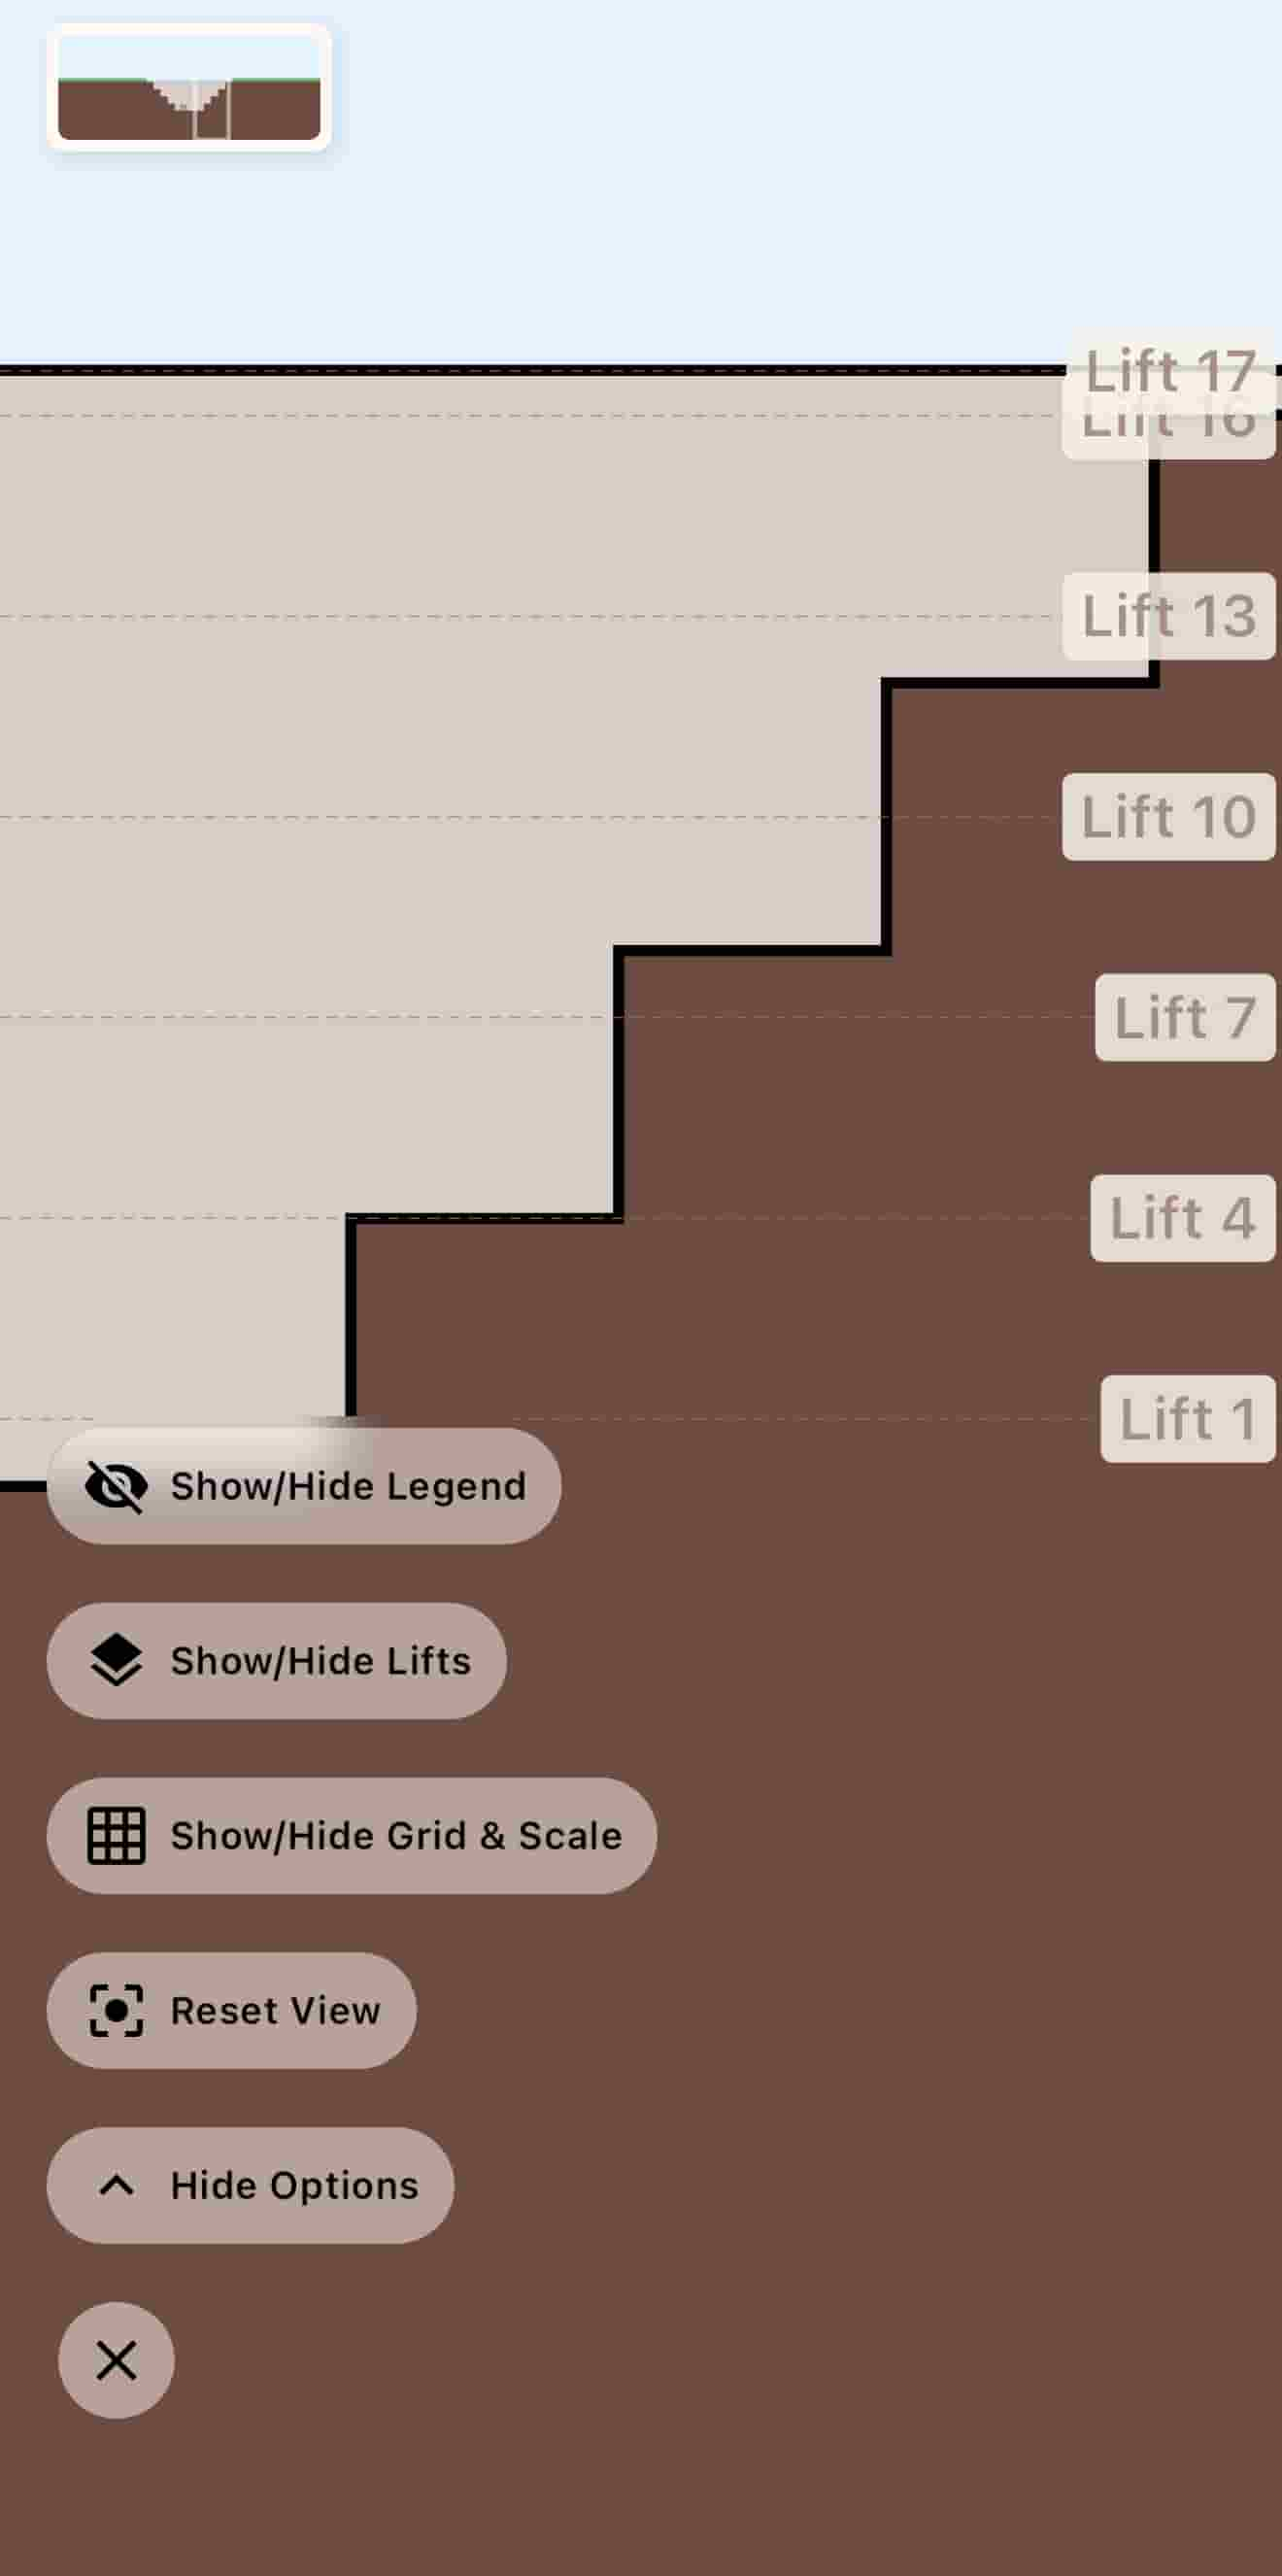
The trench diagram viewer provides a visual representation of your trench design with customizable display options:
- Show/Hide Legend: Toggle the legend to see which zones are displayed in the diagram
- Show/Hide Scale Bar: Display or hide the scale bar for reference measurements
- Show/Hide Grid: Toggle grid lines for better alignment and measurement visualization
- Show/Hide Lift Numbers: Display lift numbers on the diagram (Premium feature)
- Full Screen View: Enter full screen mode with minimap zoom in for detailed inspection
Understanding the Diagram:
- The legend shows which zones are represented in the diagram
- Cross hatch pattern indicates cement stabilized zones
- Red coloring means the culverts don't fit inside the trench
Photo Documentation
The Photo Documentation feature allows you to capture and organize project photos with GPS coordinates, timestamps, and location markers. You can optionally use a site map as a visual reference guide to pinpoint where photos were taken.
Using Photo Documentation
Step 1: Upload Site Map (Optional)
Before taking photos, you can upload a site map by clicking the "Upload Site Map" button. This uploads a picture of your site that will be used as a minimap guide for reference. The site map helps you pinpoint and visualize the exact location where you take your photos.
Step 2: Take a Photo
Click the "Take Photo" button to proceed to the camera feed. Position your device to capture the desired scene and take the photo.
Step 3: Name Your Photo
After taking the photo, the app will prompt you to name the photo. Enter a descriptive name that helps you identify the photo later (e.g., "North Excavation Day 1", "Culvert Installation Section A"). Click "Save" to confirm the name.
Step 4: Place Pin on Site Map (If Site Map Used)
If you uploaded a site map in Step 1, the app will prompt you to place a pin on the location where you took the photo. This visual marker helps you see exactly where on the site map the photo was captured.
If you didn't use a site map, the app will skip this step and proceed directly to the preview screen.
Step 5: Preview Screen
You'll be taken to the preview screen where you can review your annotated photo. The preview screen displays:
- Top Right Corner: Shows the coordinates of where the photo was taken, along with the date and time, and the facing direction (the direction your camera was pointing when the photo was taken)
- Bottom: Displays the name of the photo that you entered in Step 3
All this information is automatically captured and overlaid on your photo.
Step 6: Save to Camera Roll
Click the "Save to Camera Roll" button to save the annotated photo (with coordinates, date/time, direction, and name) to your phone's camera gallery. The photo will be available in your device's photo library for sharing or future reference.
Step 7: Take Another Photo (Optional)
Click the "New Photo" button to retake a photo if you're not satisfied with the current one, or to continue taking additional photos for your project documentation.
Photo Information Captured
Each photo automatically captures and displays:
- GPS Coordinates: Exact location where the photo was taken
- Date and Time: Timestamp of when the photo was captured
- Facing Direction: The compass direction the camera was pointing
- Photo Name: Custom name you assigned to the photo
- Site Map Pin: Visual marker on site map (if site map was uploaded)
Site Diary
The Site Diary feature allows you to record and document your work day on-site using voice recording. The app will transcribe your recording and use AI to polish it into a professional diary entry that you can copy and paste into emails or reports.
Using Site Diary
Follow these steps to create a site diary entry:
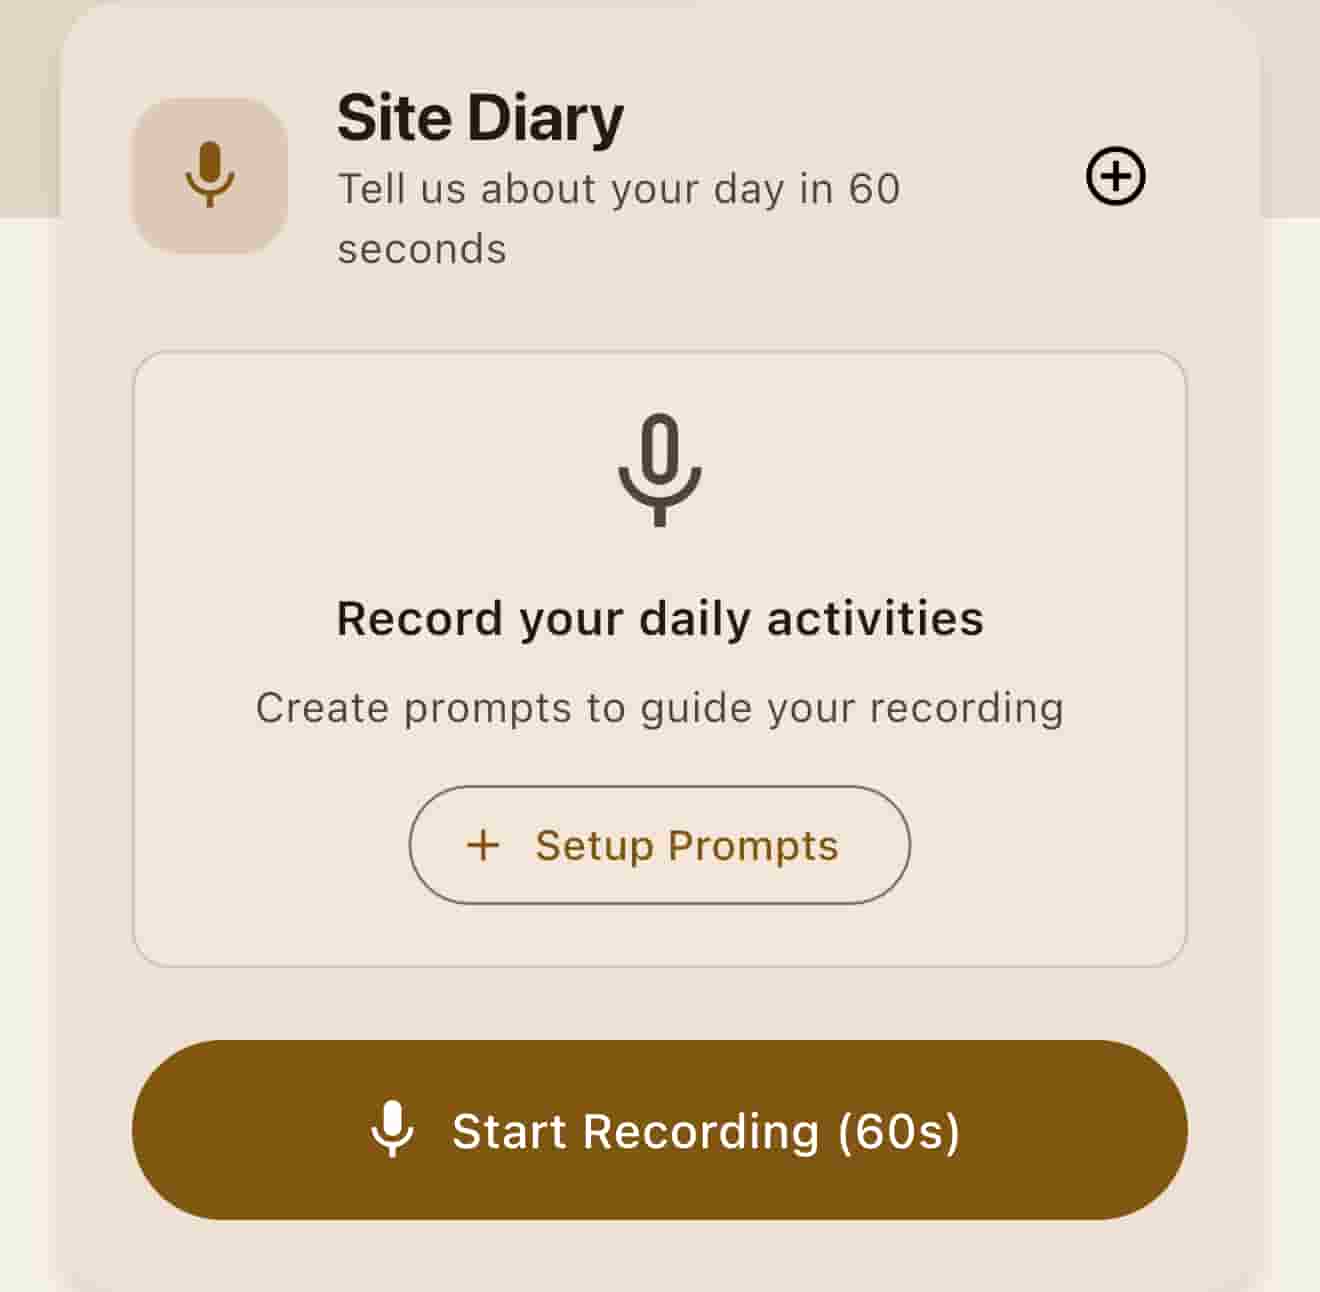
Step 1: Click on the Site Diary Tab
Navigate to the Site Diary tab in the app. If this is your first time using the feature, you'll see a brief overview that explains how the Site Diary works.
Step 2: Click the Optional Setup Prompts
Before recording, you can enable optional setup prompts. These prompts help you remember key points to mention during your recording. If you get stuck halfway through the recording, the prompts will display keywords to help you remember what to say about your work day.

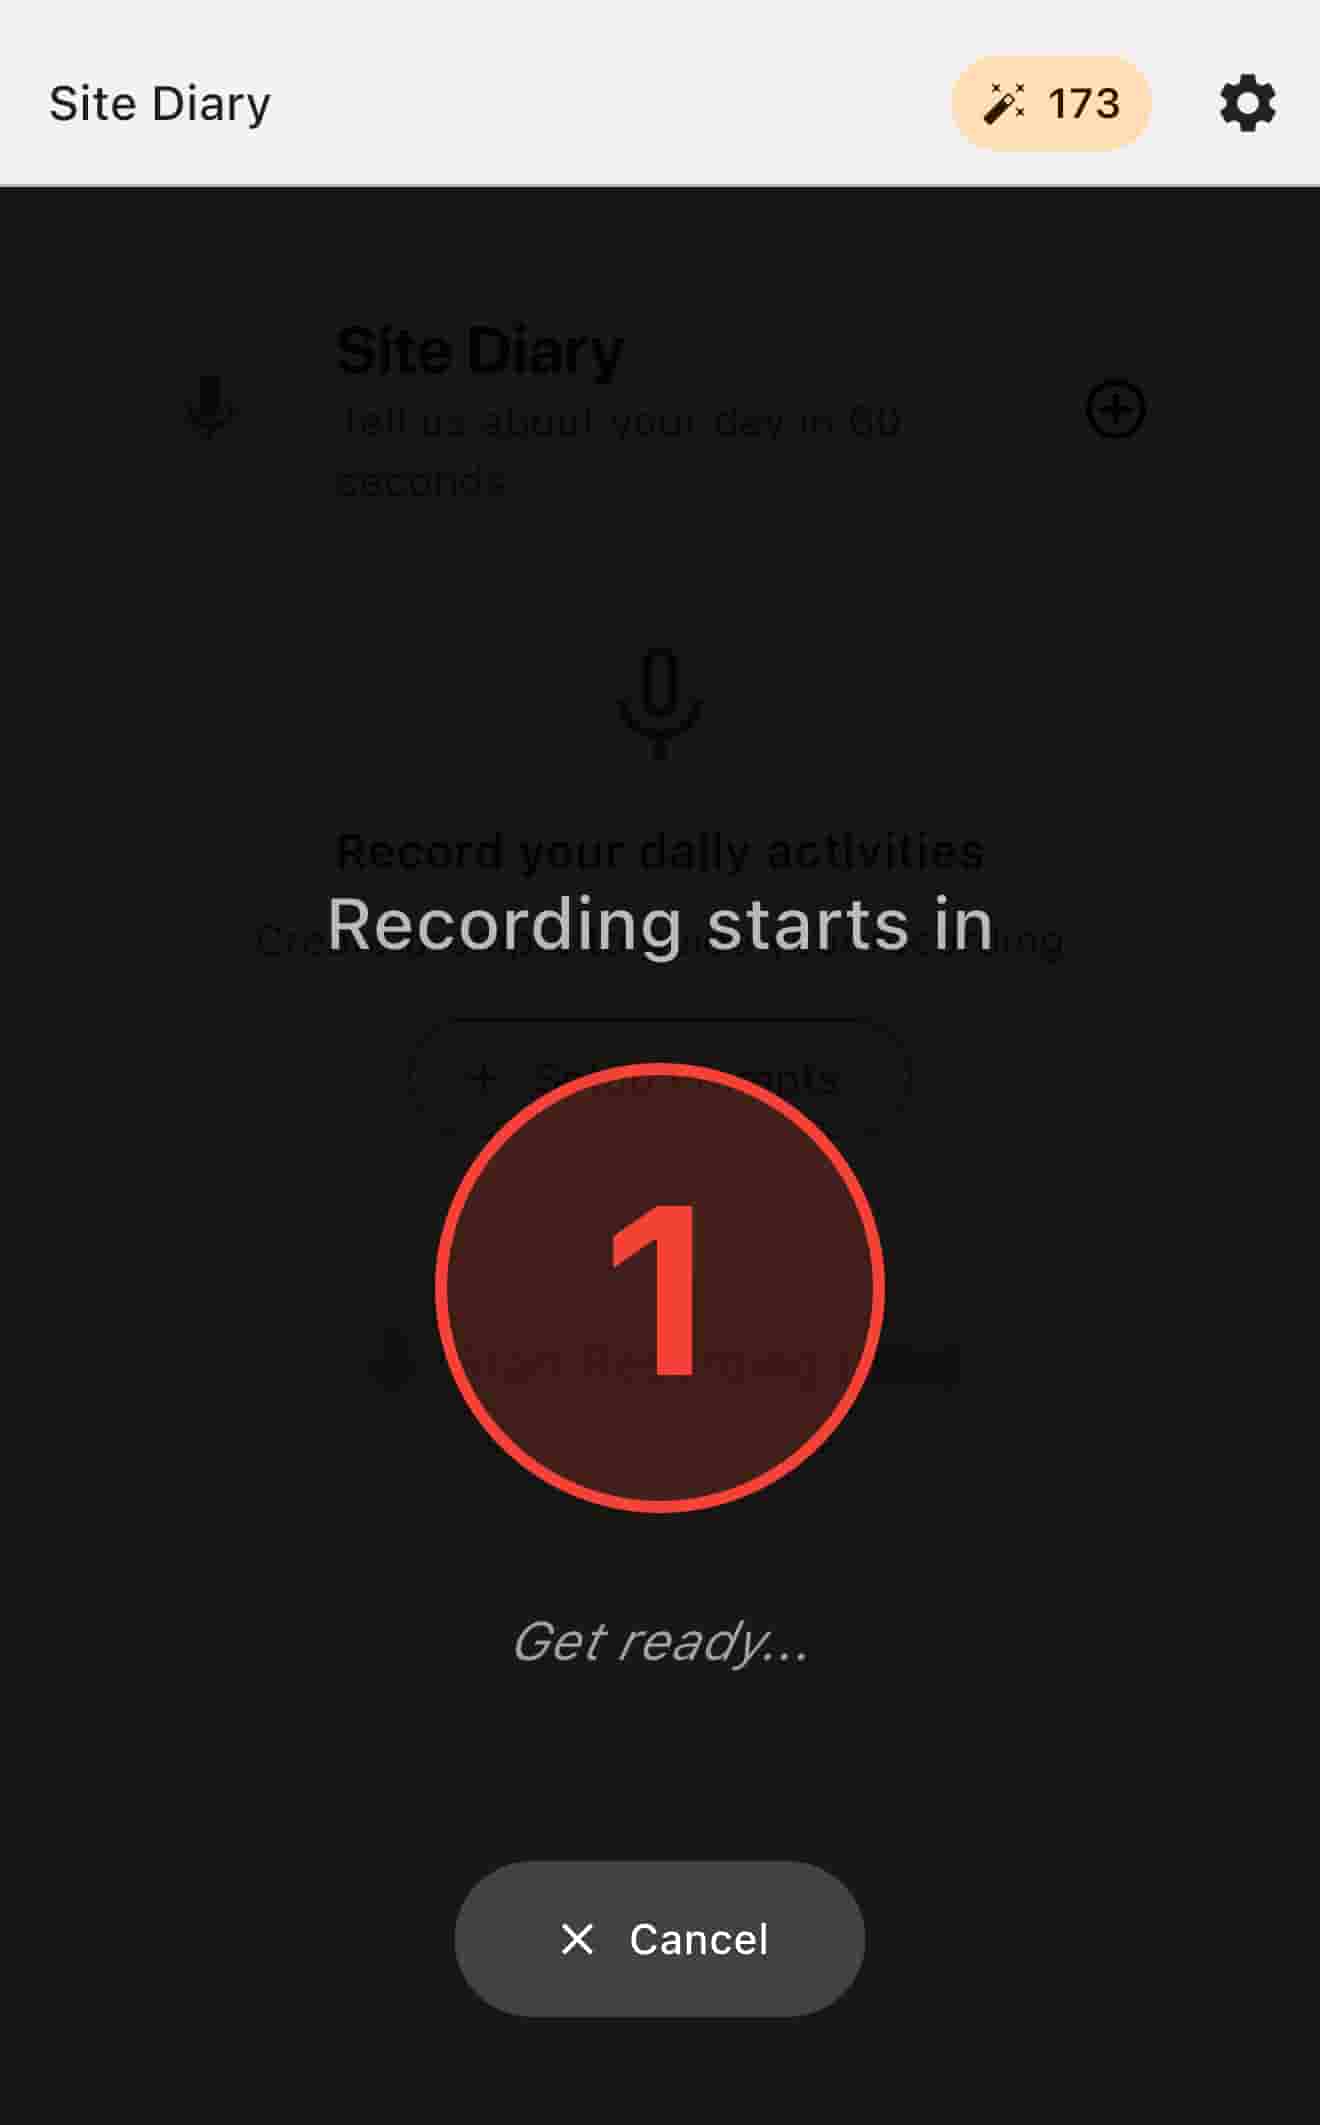
Step 3: Click the Start Recording Button
When you're ready to begin, click the "Start Recording" button. The app will start a countdown before recording begins, giving you time to prepare.
Step 4: Describe Your Work Day on Site
Speak clearly and describe your work day on site. Include details such as:
- Tasks completed
- Work progress
- Any issues or challenges encountered
- Weather conditions
- Equipment used
- Any other relevant information
You can speak naturally—the app will process and improve the transcription.
Step 5: Transcription and AI Processing
After you finish recording, the app will automatically:
- Transcribe your voice recording
- Process the transcription
- Use AI to polish and refine your recording into a professional diary entry
This processing happens automatically, so you don't need to do anything else—just wait for the polished transcription to appear.
Step 6: Receive Your Transcribed Diary Entry
Once processing is complete, you'll receive your transcribed and polished diary entry. You can:
- Click "Copy to Clipboard" to copy the text
- Paste it into any email or report that you need
The polished transcription is ready to use in your documentation without additional editing.
Site Survey — LiDAR Scanning
The Site Survey feature uses LiDAR (Light Detection and Ranging) technology to create 3D point cloud scans of stockpiles and trenches. This allows you to measure volumes accurately in the field using your device's built-in LiDAR scanner.
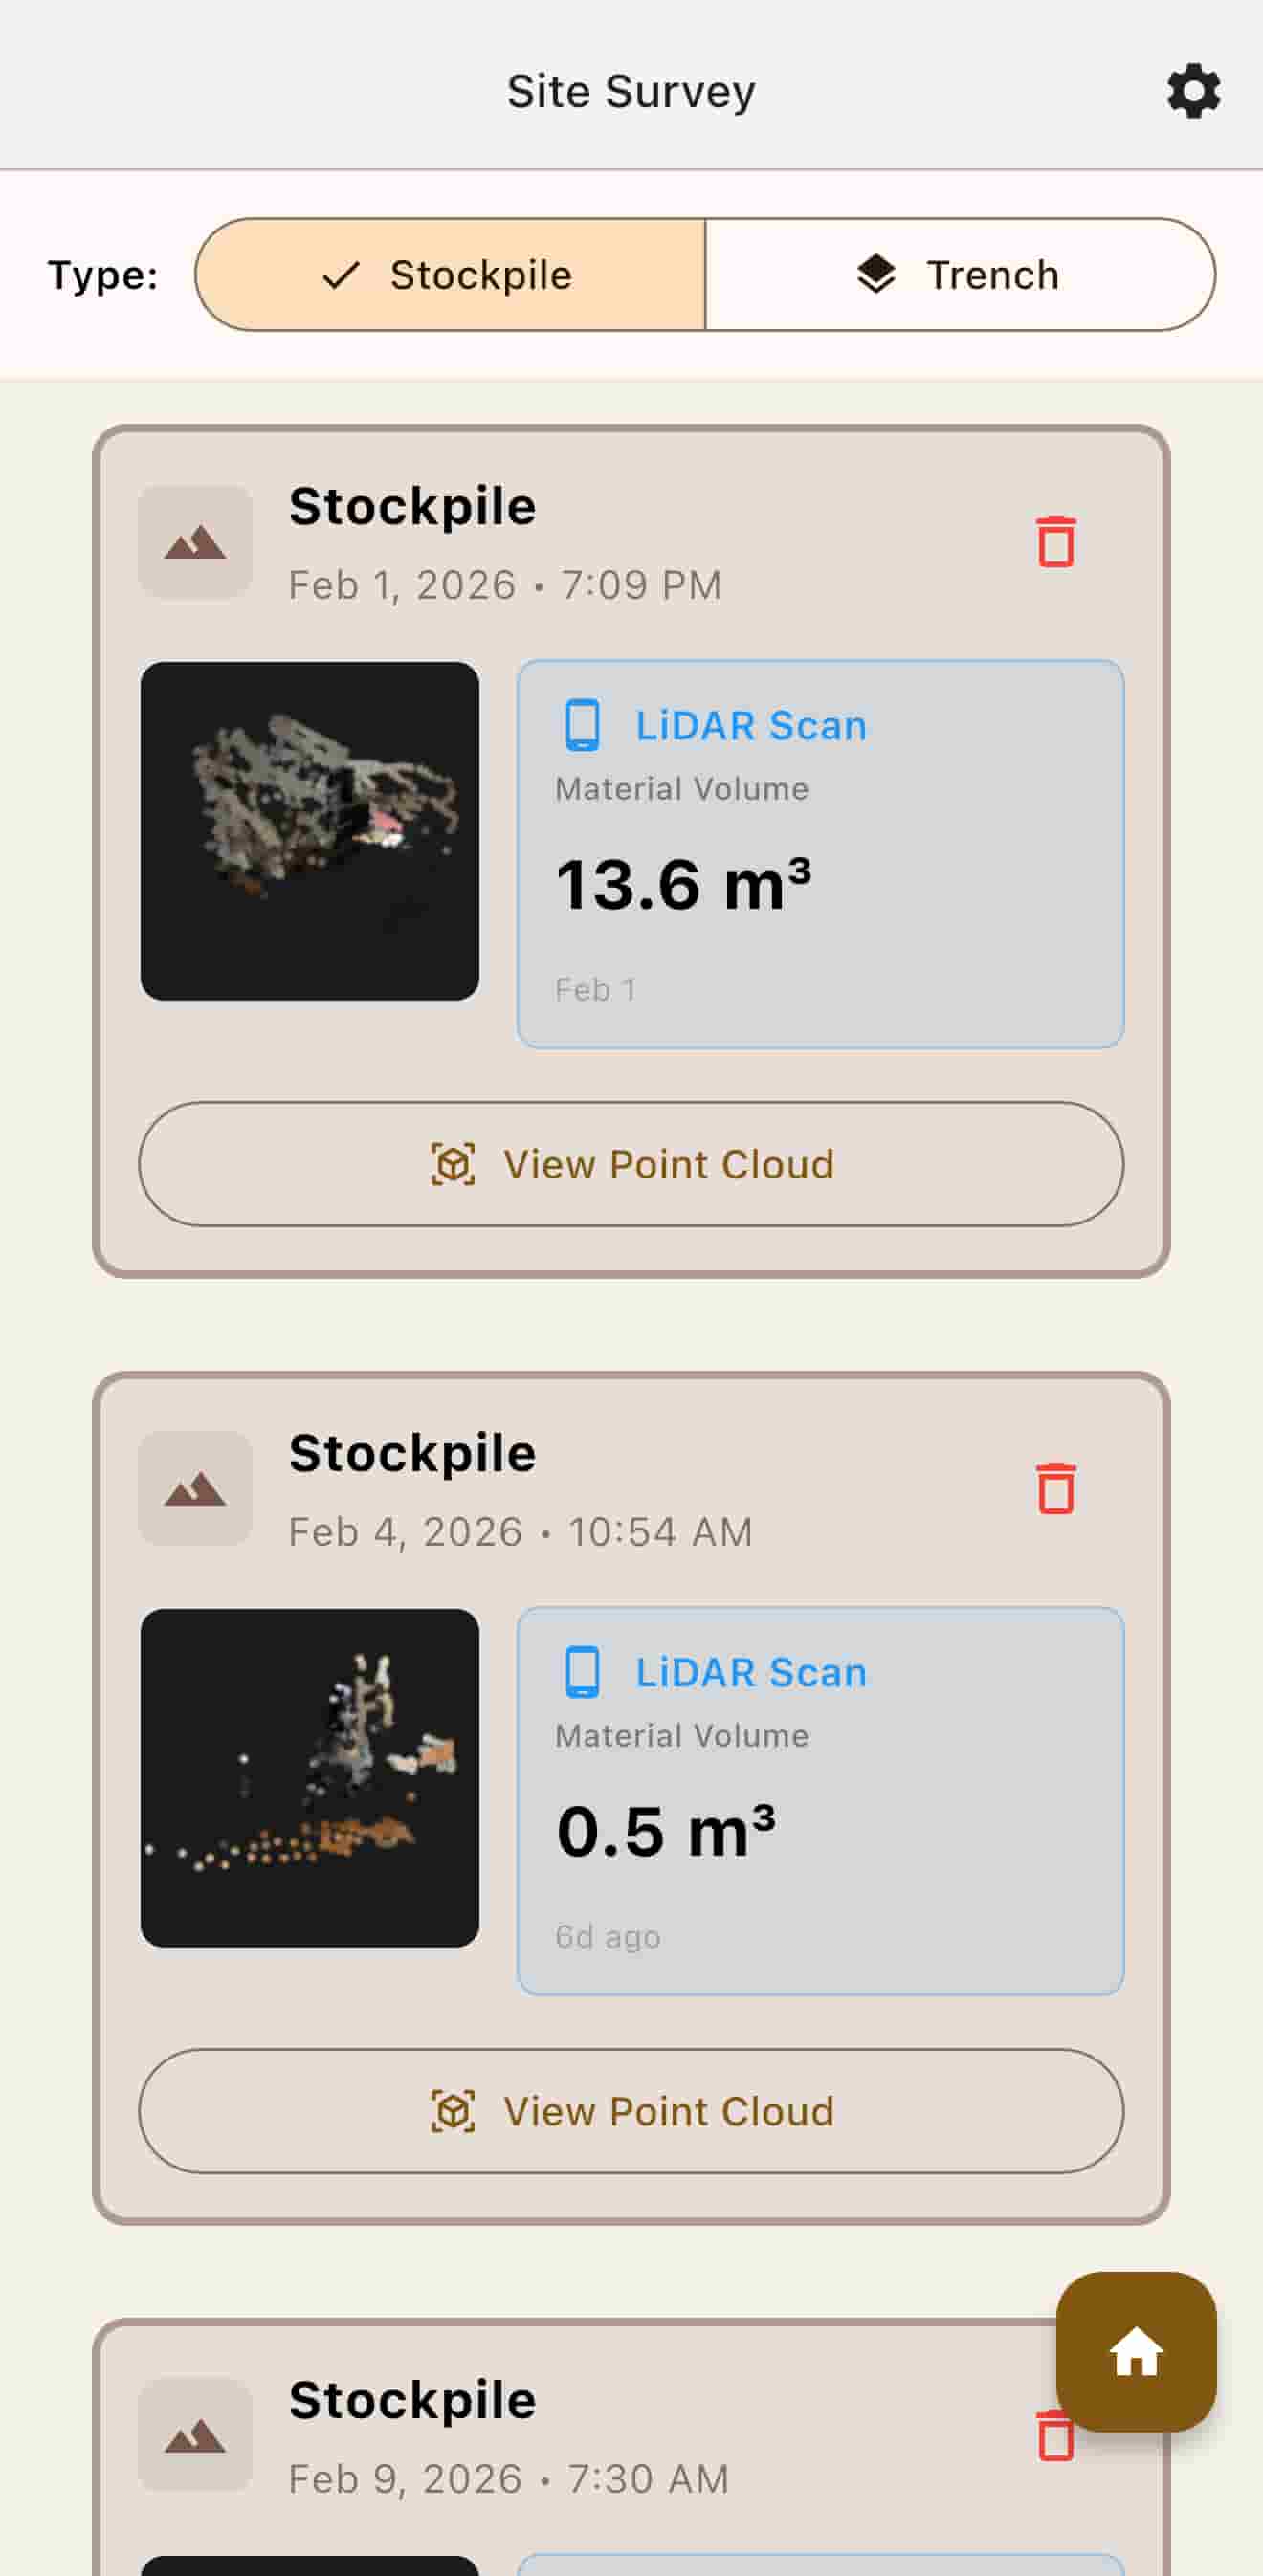
Creating a New Scan
Step 1: Select Scan Type
On the Site Survey screen, pick either Stockpile or Trench for 3D LiDAR scanning. This determines how the app processes and calculates the point cloud data.
Step 2: Start a New Scan
Click the "New Scan" button. This will bring up the camera feed with a start button visible on the screen.
Step 3: Begin Scanning
When you're ready to proceed, click the "Start Scan" button. The scanning process will begin, and LiDAR dots will appear on top of the camera feed in real-time.
The top left corner of the screen shows the number of captured dots, which increases as you scan. Move your device slowly around the object you're scanning to capture points from different angles.
Step 4: Stop Scanning
Once you're satisfied with the coverage and number of points captured, click the "Stop Scan" button. The app will process the point cloud data.
After processing completes, you'll be returned to the main Site Survey screen, which displays an estimated volume based on your scan.
Viewing and Analyzing the Point Cloud
Step 5: Open the Point Cloud Viewer
Click on the "View Point Cloud" button to enter the point cloud viewer. This 3D viewer allows you to examine and interact with your scan in detail.
Step 6: Navigation Controls
In the point cloud viewer, you can:
- Move: Navigate through the 3D space
- Zoom: Use pinch gestures to zoom in and out
- Rotate: Use one finger to rotate the view
These gestures allow you to examine your scan from any angle and distance.
Measurement Modes
The point cloud viewer offers four different modes for analyzing your scan:
1. Navigate Mode
Default mode for moving around and examining the point cloud. Use this mode to explore your scan and find areas of interest.
2. Measure Distance Mode
Measure the distance between two points. Select two dots in the point cloud, and the app will calculate and display the distance between them.
3. Area Mode
Create a surface polygon by selecting multiple dots. The app will join the dots to form a polygon and determine the area of that surface. This is useful for measuring cross-sections or surface areas.
4. Angle Mode
Uses three dots to define two planes and calculates the angle between them. Select three points to establish the angle measurement. This is helpful for measuring slopes, angles of repose, or other angular measurements.
Refined Mode and Advanced Settings
Refined Mode
In the top right corner, you can access Refined Mode. In this mode, you can see the mesh representation of your point cloud, which provides a more solid visualization of the scanned object.
Ground Plane Adjustment
In Refined Mode, you can adjust the ground plane using the slider on the top left corner. This helps align your scan with the actual ground level.
Click the "Advanced Ground Plane Settings" dropdown to reveal additional sliders that allow you to adjust the angle of the ground plane for more precise alignment.
Stockpile Peak Interpolation
For stockpile scans, click on the tab next to the ground plane settings to access the peak interpolation feature.
Since LiDAR can only capture up to 5 meters in height, the interpolation feature allows you to estimate the rest of the stockpile peak using a slider. This is particularly useful for large stockpiles that exceed the LiDAR's maximum capture range.
Troubleshooting
Common Issues
Calculations seem incorrect
If you believe your calculations are incorrect, please try the following first:
- Double-check all input values
- Verify units are consistent (meters vs feet)
- Check material density values
- Review compaction factors
- Check the trench summary by tapping the paper icon on the app bar
If the issue persists, please contact support and send over your project:
- First, go to the trench summary screen by tapping the paper icon on the app bar
- On the trench summary screen, tap the PDF button on the app bar to export your project
- Include a description of what calculation seems incorrect
- Send the exported file along with your contact information
- This will help us investigate and fix any calculation errors
Frequently Asked Questions
Can I use TrenchCalc offline?
AI features require internet connection for the diary.
What units are supported?
TrenchCalc supports both metric (meters, kilograms) and imperial (feet, pounds) units. You can switch between them in settings.
How do I cancel my subscription?
Subscriptions are managed through Google Play Store. Go to Play Store → Subscriptions → TrenchCalc → Cancel. You'll keep access until the end of your billing period.
Can I export my data?
Yes! You can export projects as PDF reports or CSV files. PDFs include all calculations and breakdowns. CSV files contain raw data for spreadsheet analysis.
What's the difference between Free, Basic, and Premium plans?
See the Pricing page for a detailed comparison. Free includes basic calculations. Basic adds cement stabilization and culvert support. Premium includes all features with advanced planning tools.